
Mình hay gặp các công ty 30-50 người trả tiền Microsoft 365 Business Premium đã 2-3 năm, nhưng khi mở tenant ra thì vẫn đang dùng Security defaults. Intune chưa enroll máy nào, Defender for Business chưa onboard máy nào, Safe Links vẫn ở cấu hình mặc định. Lý do thường là “lúc mua, bên bán chỉ nói Business Premium bảo mật hơn Business Standard“. Không ai chỉ ra cụ thể bảo mật hơn ở đâu, và nên bật cái gì trước.
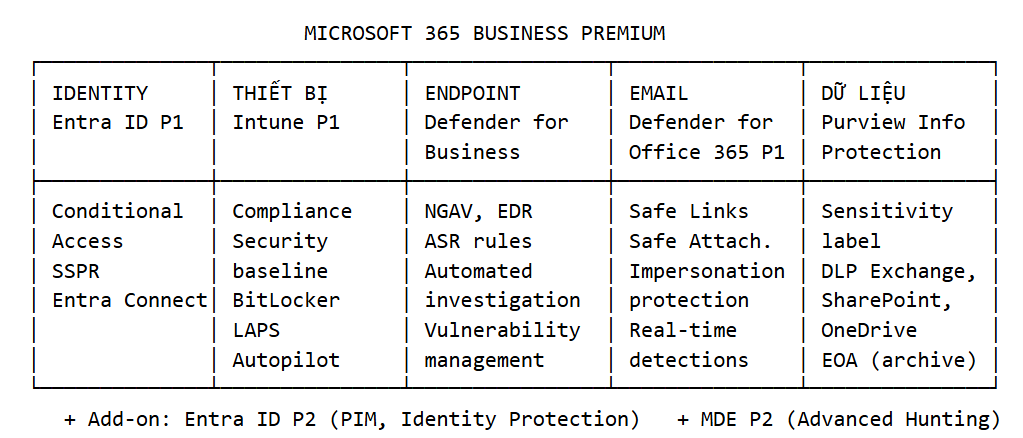
So với Business Standard, Business Premium có thêm 5 sản phẩm bảo mật, trước đây phải mua riêng: Entra ID P1, Intune Plan 1, Defender for Business, Defender for Office 365 Plan 1 và Purview Information Protection. Nếu bật sai thứ tự, ví dụ áp Conditional Access đòi thiết bị compliant trong khi chưa máy nào enroll Intune, cả công ty sẽ bị khóa ngoài email vào sáng thứ Hai.
Bài này mình sẽ vẽ bản đồ những gì Business Premium có, cộng với các add-on thường gặp (Entra ID P2, Defender for Endpoint P2).
Điều kiện cần
| Yêu cầu | Chi tiết |
|---|---|
| License | Microsoft 365 Business Premium (tối đa 300 user). Tenant demo trong series có thêm 15 Entra ID P2, 15 Defender for Endpoint P2, 15 Teams Enterprise, Power Automate Premium |
| Quyền | Global Administrator cho phần dọn quyền admin; sau đó dùng Security Administrator, Intune Administrator, Conditional Access Administrator theo từng việc |
| Công cụ | PowerShell, module Microsoft.Graph, ExchangeOnlineManagement |
Tính năng bảo mật
| Rủi ro thường gặp ở SMB | Tính năng xử lý |
|---|---|
| Mật khẩu bị lộ, đăng nhập từ nước ngoài | Conditional Access, MFA |
| Admin bị chiếm quyền | PIM, Identity Protection (P2) |
| Laptop mất, máy không mã hóa | Intune, BitLocker, LAPS |
| Ransomware, mã độc | Defender for Business / MDE P2, ASR |
| Email giả mạo giám đốc đòi chuyển tiền | Defender for Office 365 P1 |
| Không ai trực alert ngoài giờ | Power Automate + Teams |
| Rò rỉ hợp đồng, dữ liệu khách hàng | Sensitivity label, DLP |
Bước 1: Secure score
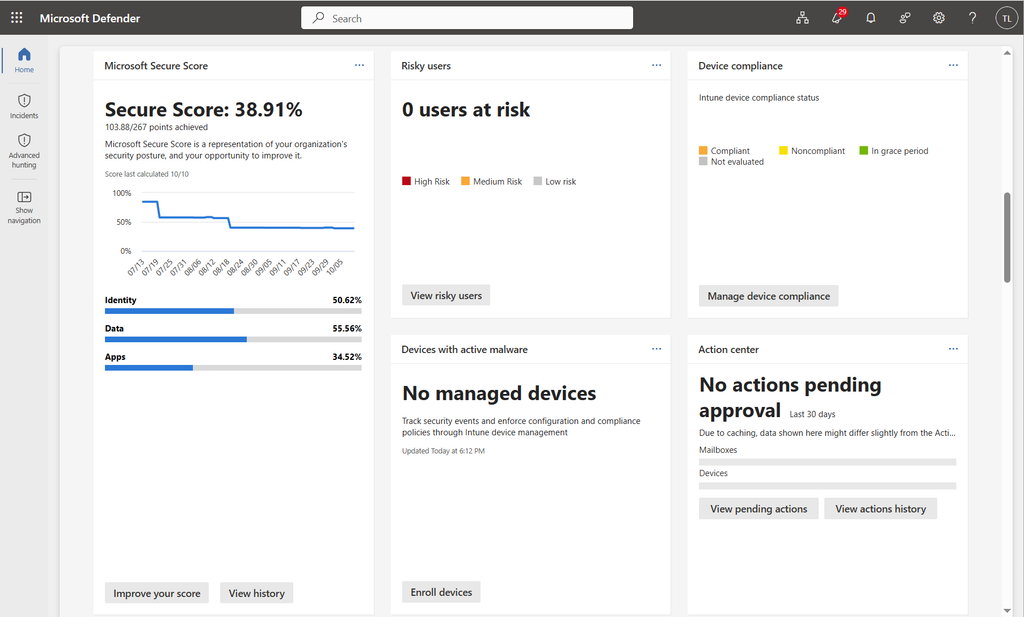
Mục đích là có số đo trước và sau 30 ngày để báo cáo ban giám đốc.
- Vào Microsoft Defender portal (security.microsoft.com) → Exposure management → Secure Score
- Ghi lại điểm hiện tại, mở tab Recommended actions → Export
Bước 2: Dọn quyền admin và tạo tài khoản break-glass
Mục đích là giảm số tài khoản có thể phá cả tenant, và có lối thoát khi Conditional Access cấu hình sai.
# Liệt kê thành viên của các role quản trị
Connect-MgGraph -Scopes "RoleManagement.Read.Directory","User.Read.All"

Get-MgDirectoryRole -All | ForEach-Object {
    $role = $_
    Get-MgDirectoryRoleMember -DirectoryRoleId $role.Id -All | ForEach-Object {
        [PSCustomObject]@{ Role = $role.DisplayName; User = $_.AdditionalProperties.userPrincipalName }
    }
} | Sort-Object Role | Format-Table -AutoSize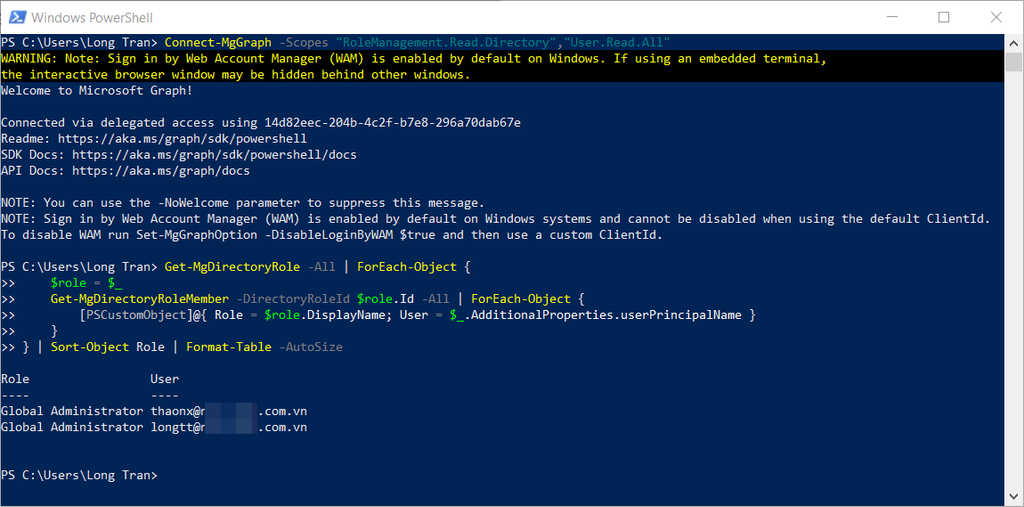
- Giữ 2-4 Global Admin, mỗi người một tài khoản admin riêng dạng
adm.longtt@khongkho.com, không gán license - Chuyển các admin khác về role hẹp hơn: Exchange Administrator, Intune Administrator, User Administrator, Helpdesk Administrator
- Tạo tài khoản break-glass
adm.longtt@domain.onmicrosoft.com
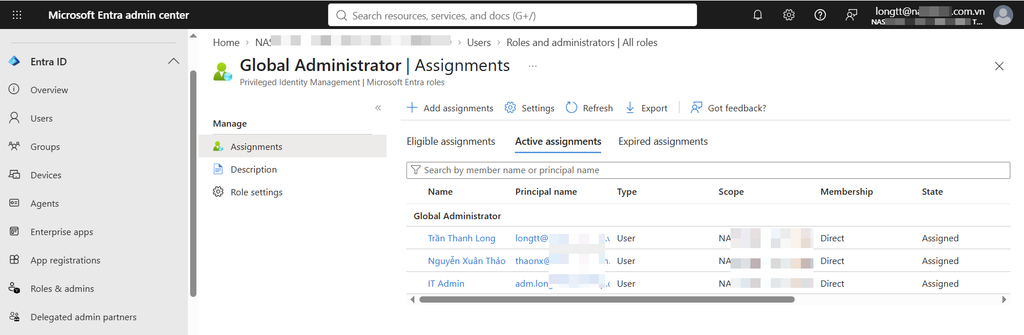
Kết quả kỳ vọng: không còn tài khoản dùng hằng ngày (đọc email, lướt web) mang role Global Administrator.
Lưu ý: Khác với Security defaults, Conditional Access cho phép loại trừ tài khoản break-glass.
Bước 3: Chặn user tự cấp quyền cho ứng dụng
Mục đích là chặn consent phishing: nhân viên bấm “Accept” cho một app giả mạo, app đọc được email kể cả khi đã có MFA.
- Vào Entra admin center → Identity → Applications → Enterprise applications → Consent and permissions → User consent settings
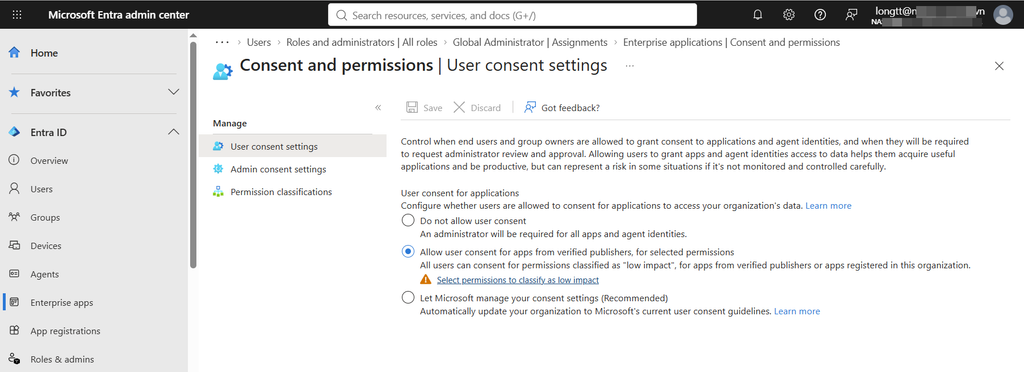
- Chọn Allow user consent for apps from verified publishers, for selected permissions
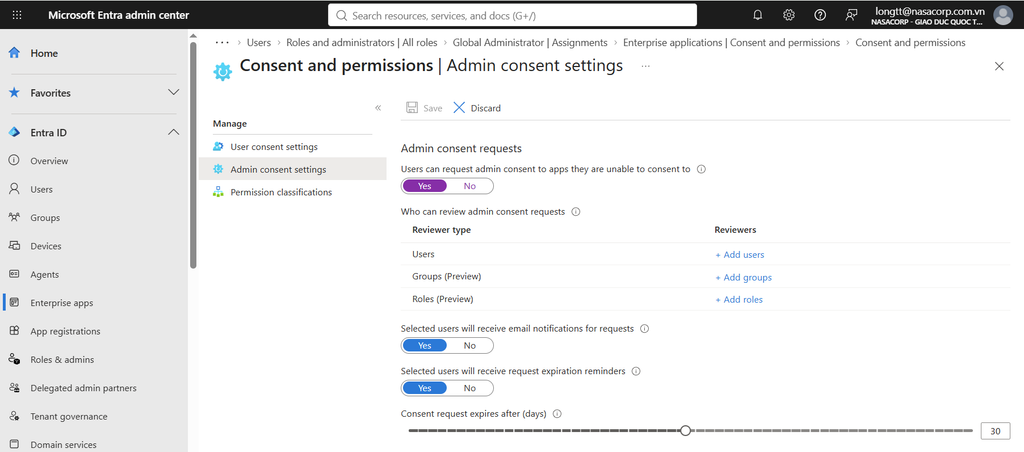
- Ở Admin consent settings: bật Users can request admin consent, chọn reviewer là nhóm IT
- Users → User settings: Users can register applications = No
Bước 4: Bật Defender for Office 365 preset Standard
Mục đích là có ngay Safe Links, Safe Attachments, impersonation protection ở mức khuyến nghị cho toàn công ty. Bài 6 sẽ tinh chỉnh chi tiết.
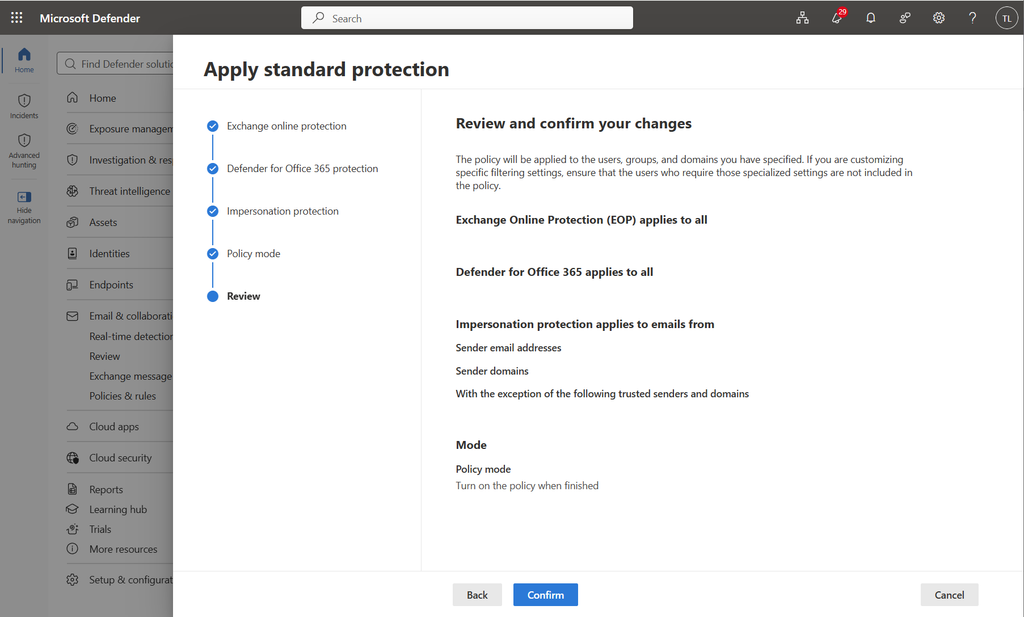
- Vào Defender portal → Email & collaboration → Policies & rules → Threat policies → Preset security policies
- Standard protection → Manage protection settings
- Apply Exchange Online Protection và Apply Defender for Office 365 protection: All recipients
- Bỏ qua phần impersonation ở bước này (bài 6 cấu hình), chọn Turn on policy when finished
Bước 5: Siết chia sẻ file ra ngoài
Mục đích là báo giá, hợp đồng không bị share qua link “Anyone” ai cũng mở được.
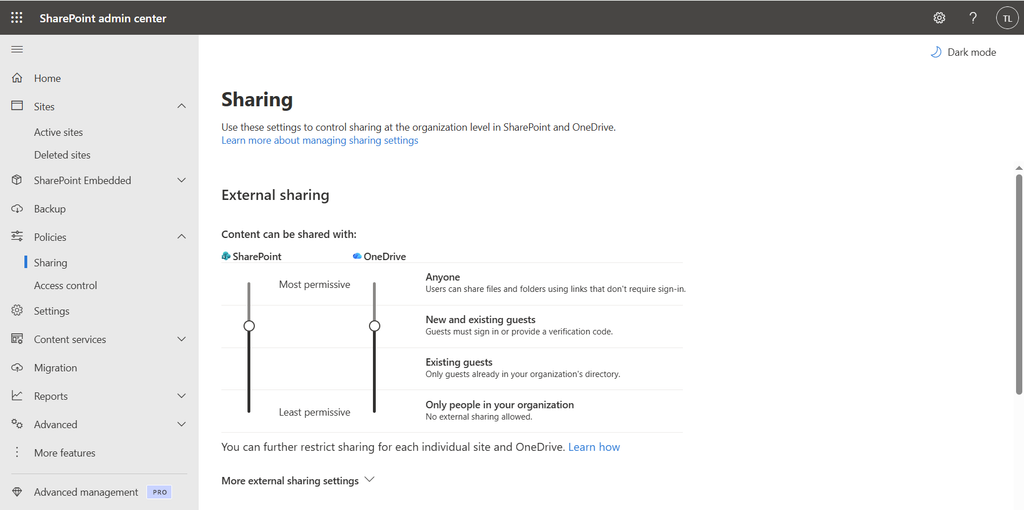
- SharePoint admin center → Policies → Sharing
- SharePoint và OneDrive: New and existing guests
- File and folder links: mặc định Specific people; nếu vẫn cần “Anyone” cho vài site marketing, đặt These links must expire within this many days:
7
Bước 6: Xác nhận Audit log và bật thông báo incident qua email
Mục đích là có dấu vết khi điều tra, và có người nhận cảnh báo ngay từ ngày đầu, trước khi có flow ở bài 7.
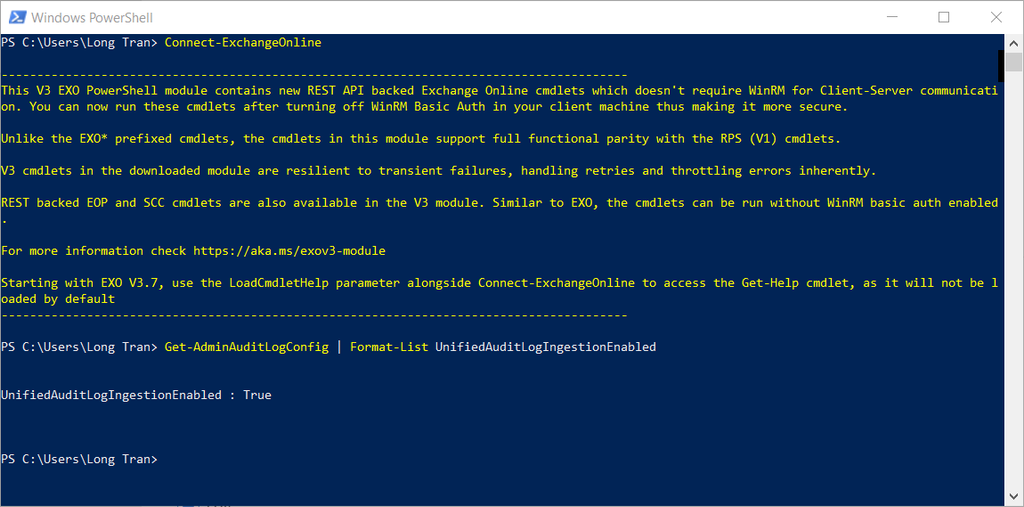
Connect-ExchangeOnline
Get-AdminAuditLogConfig | Format-List UnifiedAuditLogIngestionEnabled
# Nếu False:
# Set-AdminAuditLogConfig -UnifiedAuditLogIngestionEnabled $true
Bật email thông báo incident:
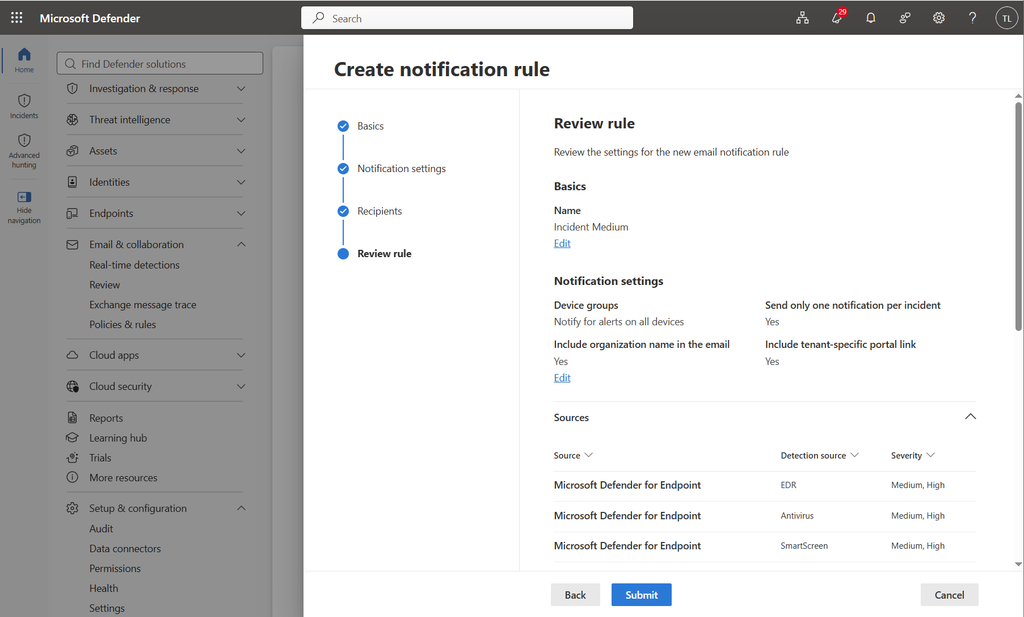
- Defender portal → Settings → Microsoft Defender XDR → Email notifications → Incidents → Add incident notification rule
- Tên
Incident Medium, Severity: High, Medium - Người nhận: ví dụ
longtt@domain.onmicrosoft.com
Từ thực tế: Ở doanh nghiệp nhỏ, alert Defender thường “nổ” đúng nhưng không ai đọc, vì alert chỉ nằm trên portal mà admin kiêm nhiệm không mở hằng ngày. Một rule email thông báo 2 phút cấu hình có giá trị hơn mọi tinh chỉnh khác trong tuần đầu.
Tài liệu tham khảo
- Microsoft 365 Business Premium security overview
- Microsoft 365 for business subscription comparison
- Manage emergency access accounts in Microsoft Entra ID
- Preset security policies
- Configure incident email notifications in Microsoft Defender XDR
Công ty bạn đang dùng Business Premium được bao lâu và đã bật được mấy trong 5 sản phẩm bảo mật? Chia sẻ trong comment nhé.