
Chào các bạn!
Ở 8 bài trước, mình đã xây lớp bảo vệ cho Identity, Endpoint, và dựng SIEM/SOAR với Sentinel. Tất cả đều tốt, nhưng đó là bảo vệ cho người dùng và thiết bị.
Còn hạ tầng cloud thì sao?
Nếu bạn có VM chạy Windows Server trên Azure với cổng RDP mở ra internet, một database SQL để mật khẩu mặc định, hoặc Storage Account không bật encryption, những thứ đó là lỗ hổng không liên quan gì đến Identity hay Endpoint, nhưng attacker có thể khai thác trực tiếp.
Microsoft Defender for Cloud giải quyết đúng vấn đề này: liên tục quét toàn bộ Azure resources, tìm misconfiguration, đánh giá compliance, và bảo vệ workloads đang chạy.
Bài này mình sẽ đi qua toàn bộ, từ bật Defender for Cloud đến tối ưu Secure Score, cấu hình Just-in-time VM access, chạy vulnerability assessment, và phân tích attack path.
Hai trụ cột của Defender for Cloud
Cần phân biệt rõ 2 khái niệm trước khi vào lab:
CSPM (Cloud Security Posture Management), trả lời câu hỏi: “Hạ tầng cloud của mình đang cấu hình có an toàn không?”
- Quét tất cả resources, tìm misconfiguration
- Đánh giá theo best practices (CIS, Azure Security Benchmark)
- Map với các framework compliance (ISO 27001, PCI DSS, NIST)
- Cho điểm Secure Score để đo tiến độ cải thiện
- Attack path analysis: mô phỏng attacker có thể đi từ internet đến sensitive data theo con đường nào
CWPP (Cloud Workload Protection Platform) Trả lời câu hỏi: “Workloads đang chạy có đang bị tấn công không?”
- Monitor realtime: VMs, containers, databases, storage
- Phát hiện malware, brute force, lateral movement, data exfiltration
- Tích hợp MDE lên VMs để có EDR đầy đủ
- Just-in-time access: không mở RDP/SSH liên tục
Defender for Cloud
        │
        ├── CSPM (Posture)     ─── Secure Score, Recommendations, Compliance, Attack Path
        └── CWPP (Protection)  ─── Alerts, Vulnerability Assessment, JIT, FIM
Defender plans và chi phí _ Đọc kỹ trước khi sử dụng
Defender for Cloud có free tier và paid plans theo từng loại resource.
Free tier (Foundation CSPM)
Có sẵn trên tất cả subscription, không cần làm gì để kích hoạt. Bao gồm:
- Secure Score cơ bản
- Security recommendations
- Continuous assessment
Paid plans (Defender CSPM + CWPP)
| Plan | Chi phí | Bảo vệ |
|---|---|---|
| Defender CSPM | ~$0.007/resource/hour | Attack path, governance, agentless scanning |
| Defender for Servers Plan 1 | ~$5/server/month | MDE integration, JIT |
| Defender for Servers Plan 2 | ~$15/server/month | Plan 1 + vulnerability assessment, FIM, 500MB Sentinel/ngày |
| Defender for Storage | $10/storage account/month | Malware scanning, anomaly detection |
| Defender for SQL on Azure | $15/server/month | SQL threat detection, vulnerability assessment |
| Defender for Containers | $7/core/month | Container image scanning, runtime protection |
| Defender for App Service | $15/app/month | Web app threat detection |
| Defender for Key Vault | $0.02/10k operations | Key Vault threat detection |
Mẹo cho lab và SMB: Bắt đầu với Defender for Servers Plan 1 (~$5/server) và Defender CSPM để có đủ tính năng demo. Tổng chi phí cho 3-5 server test là khoảng $20-40/tháng. Nhớ tắt sau khi demo nếu không dùng thường xuyên.
Điều kiện cần
| Yêu cầu | Chi tiết |
|---|---|
| Azure subscription | Cần, và resource cần protect phải ở trong subscription |
| Quyền | Security Admin hoặc Contributor trên subscription |
| VMs để demo | Ít nhất 1 Windows VM và 1 Linux VM trên Azure |
| Log Analytics workspace | Đã tạo ở bài 7, dùng lại cùng workspace |
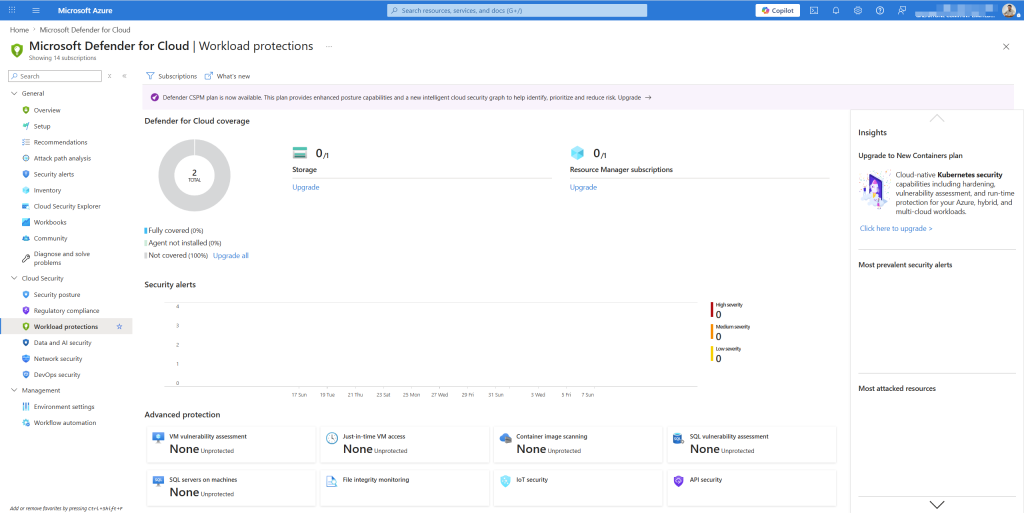
Bước 1: Bật Defender for Cloud và khám phá giao diện
- Vào portal.azure.com → tìm Microsoft Defender for Cloud
- Lần đầu vào sẽ thấy Get started page, bấm Upgrade để bật trên subscription
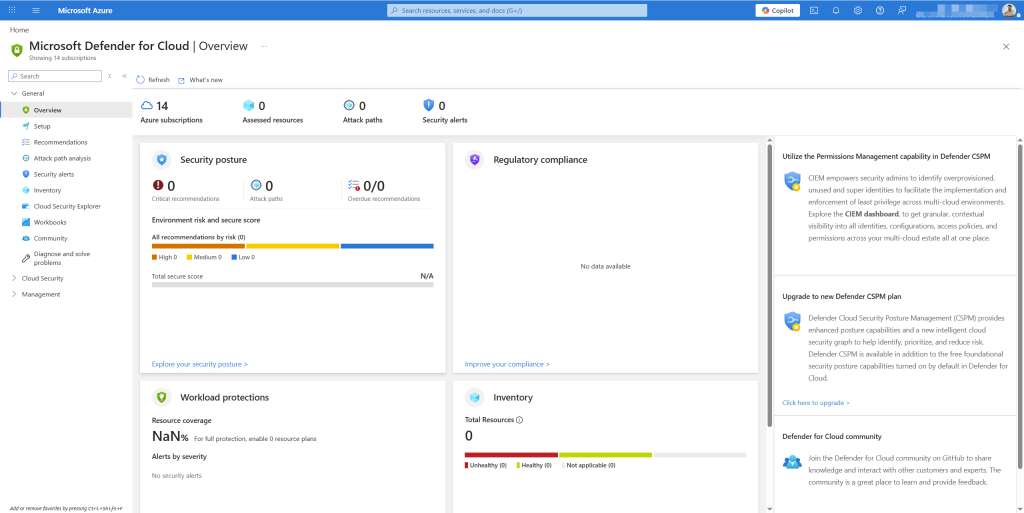
- Sau khi upgrade, vào Overview, trang tổng quan gồm:
- Secure Score: điểm hiện tại (%)
- Regulatory compliance: số control đang pass/fail
- Workload protections: coverage theo từng resource type
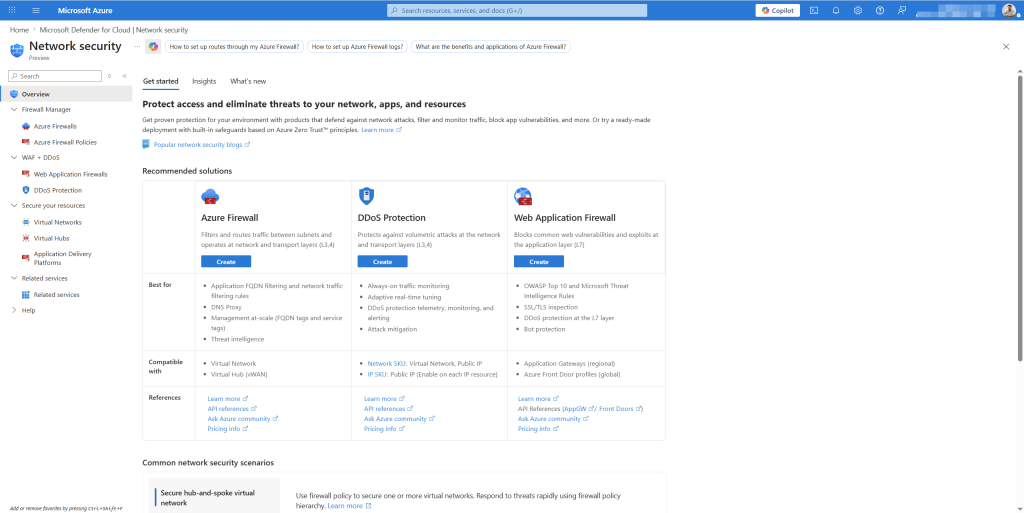
- Firewall Manager: tổng quan network security
- Insights: top recommendations cần làm ngay
Bước 2: Bật Defender plans phù hợp
- Defender for Cloud → Environment settings
- Expand subscription → click vào subscription
- Tab Defender plans, hiển thị tất cả plans và trạng thái hiện tại
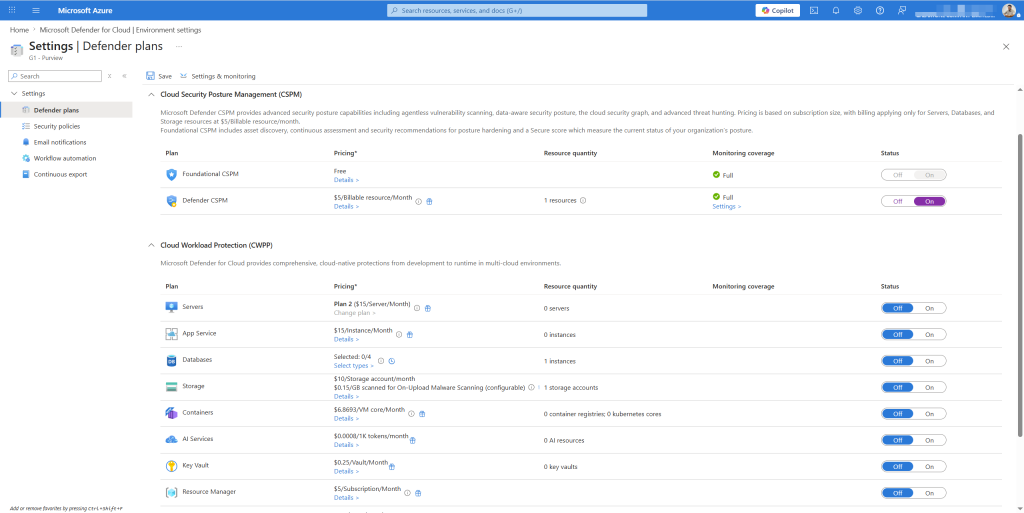
- Bật theo thứ tự ưu tiên:
Bật ngay:
- Servers → Plan 1 (sau này upgrade lên Plan 2 nếu cần)
- Defender CSPM → On (để có attack path analysis)
Bật nếu có resource tương ứng:
- Storage → nếu có Storage Accounts chứa dữ liệu nhạy cảm
- Databases → nếu có Azure SQL
- Key Vault → luôn nên bật nếu có Key Vault
- Tab Settings → Auto provisioning:
- Bật Log Analytics agent → chọn workspace đã tạo ở bài 7
- Bật Microsoft Defender for Endpoint integration
- Bật Vulnerability assessment for machines → chọn Microsoft Defender Vulnerability Management (miễn phí với Plan 2)
- Save
Bước 3: Secure Score _ Đo và cải thiện Security posture
Secure Score là thước đo tổng thể: 100% nghĩa là đang follow tất cả best practices. Thực tế rất ít tenant đạt trên 70% khi mới bắt đầu.
- Defender for Cloud → Posture management → Secure score
Đọc Secure Score đúng cách
Score được tính theo security controls (nhóm recommendations), không phải từng recommendation riêng lẻ. Mỗi control có một số điểm tối đa, phải hoàn thành tất cả recommendations trong control đó mới được điểm đầy.
Ví dụ: control “Enable MFA” tối đa 10 điểm. Nếu bạn bật MFA cho 95/100 users, bạn vẫn được 0 điểm cho control này vì chưa hoàn thành 100%.
Chiến lược tăng điểm nhanh:
- Filter recommendations theo Potential score increase, làm những cái tăng điểm nhiều nhất trước
- Ưu tiên recommendations có Quick fix, một click là xong
- Bỏ qua hoặc exempt những cái không phù hợp với môi trường của bạn
Xem và xử lý recommendations
- Posture management → Recommendations
- Click vào một recommendation, ví dụ: “Management ports of virtual machines should be protected with just-in-time network access control”
- Xem:
- Description: vấn đề là gì
- Remediation steps: cách sửa
- Affected resources: VM nào đang bị ảnh hưởng
- Quick fix: nút sửa tự động nếu có
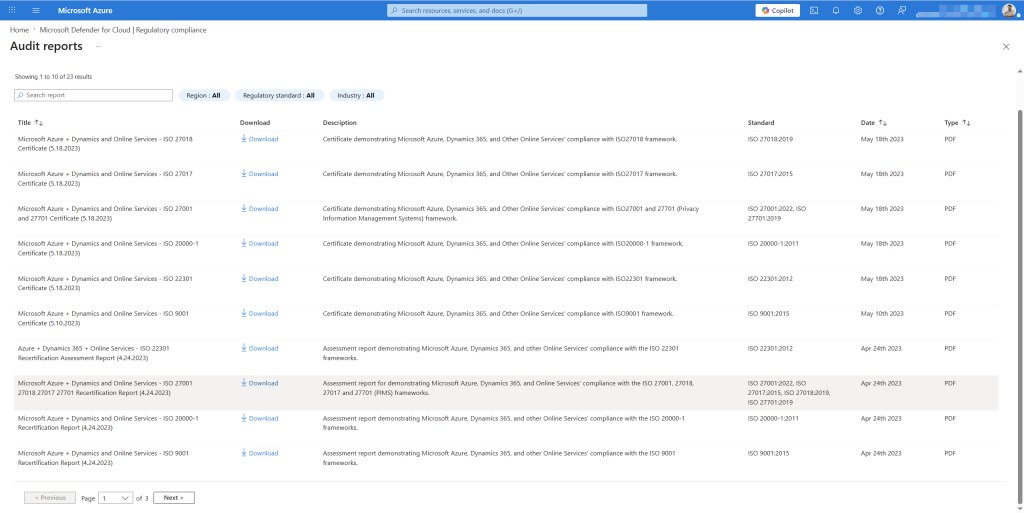
Bước 4: Regulatory Compliance dashboard
Một trong những tính năng mình thấy giá trị nhất cho compliance team, tự động map cấu hình Azure của bạn vào các framework như ISO 27001, PCI DSS, NIST SP 800-53.
- Defender for Cloud → Regulatory compliance
- Click vào ISO 27001:2013 → xem breakdown từng domain:
- Domain A.9 — Access control
- Domain A.12 — Operations security
- Domain A.16 — Information security incident management
- v.v.
- Click vào một domain → xem từng control → xem resources nào đang Pass/Fail

Dùng cho báo cáo: Export report PDF để gửi cho audit team hoặc management.
- Bấm Download report → chọn framework → chọn format (PDF/Excel)
- Report tự động tổng hợp mọi thứ, không cần làm thủ công
Bước 5: Vulnerability Assessment cho VMs
Sau khi bật Plan 2 và auto-provisioning, Defender tự động chạy vulnerability scan trên tất cả VMs. Không cần cài thêm agent riêng.
- Defender for Cloud → Recommendations → tìm “Machines should have vulnerability findings resolved”
- Click vào recommendation → xem danh sách vulnerabilities tìm thấy
- Click vào một VM → xem danh sách CVEs chi tiết:
- CVE ID và severity (Critical/High/Medium/Low)
- CVSS score
- Mô tả vulnerability
- Remediation: patch nào cần install
- Click vào một CVE cụ thể → xem:
- Vulnerability details
- Affected software version
- Available fix (patch KB number cho Windows, package version cho Linux)
- Exploit availability (Microsoft có đánh dấu nếu CVE đang bị khai thác trong thực tế)
Ưu tiên vá lỗi: Không phải CVE nào cũng nguy hiểm như nhau. Tập trung vào CVE có Exploit available = Yes và CVSS ≥ 9.0 trước. Những cái này đang bị khai thác thực tế, không phải lý thuyết.
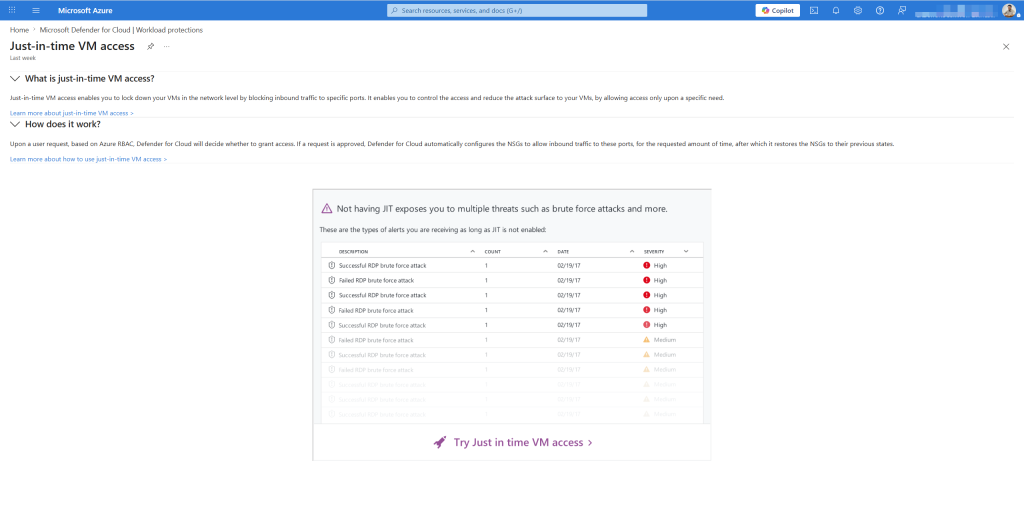
Bước 6: Just-in-time VM access
Tương tự PIM cho admin accounts (bài 3), Just-in-time (JIT) VM access đóng cổng RDP (3389) và SSH (22) mặc định, chỉ mở khi có request, và tự đóng lại sau thời gian giới hạn.
Nếu để RDP/SSH mở 24/7, bot sẽ quét và brute force liên tục. JIT loại bỏ hoàn toàn attack vector này.
Bật JIT cho VM
- Defender for Cloud → Workload protections → Just-in-time VM access
- Tab Not configured, danh sách VMs chưa có JIT
- Click vào VM → Enable JIT on 1 VM
- Cấu hình ports:
| Port | Protocol | Allowed source IPs | Max request time |
|---|---|---|---|
| 3389 (RDP) | TCP | My IP only | 3 hours |
| 22 (SSH) | TCP | My IP only | 3 hours |
| 5985 (WinRM) | TCP | My IP only | 3 hours |
- Save → VM sẽ có NSG rule block tất cả inbound đến 3 ports này
Request access khi cần kết nối
- Defender for Cloud → JIT VM access → tab Configured
- Click vào VM → Request access
- Điền:
- Ports cần mở
- Thời gian cần (tối đa theo config)
- Source IP (tự động điền IP hiện tại của bạn)
- Bấm Open ports
- NSG rule tự động tạo cho phép IP của bạn vào port 3389 trong 2 giờ, sau đó tự đóng
- Kết nối RDP bình thường trong thời gian đó
Lưu ý: Với Defender for Servers Plan 1 trở lên, JIT được quản lý bởi Defender for Cloud. Nếu chỉ dùng Free tier, JIT vẫn có nhưng tính năng limited.
Bước 7: File Integrity Monitoring
FIM theo dõi sự thay đổi của các file và registry key quan trọng OS files, config files, SSH keys. Nếu attacker modify /etc/passwd trên Linux hoặc thêm persistence vào registry Windows, FIM phát hiện ngay.
- Defender for Cloud → Workload protections → File integrity monitoring
- Chọn workspace Log Analytics → Enable
- Sau khi bật, xem Default watchlist danh sách files và registry mặc định đang được monitor:
Windows mặc định:
C:\Windows\System32\*– system filesC:\Windows\System32\drivers\etc\hosts– hosts file (hay bị modify để redirect traffic)- Registry:
HKLM\SOFTWARE\Microsoft\Windows NT\CurrentVersion\* - Registry:
HKLM\SYSTEM\CurrentControlSet\Services\*(services – persistence)
Linux mặc định:
/etc/passwd– user accounts/etc/shadow– password hashes/etc/sudoers– sudo permissions/bin/,/sbin/,/usr/bin/– system binaries
- Thêm custom paths nếu cần:
- Web server:
C:\inetpub\wwwroot\*hoặc/var/www/html/* - Config files của ứng dụng
- SSH authorized_keys:
/home/*/.ssh/authorized_keys
- Web server:
Xem FIM alerts
- FIM page → Changes over time
- Chọn machine và time range → xem danh sách changes
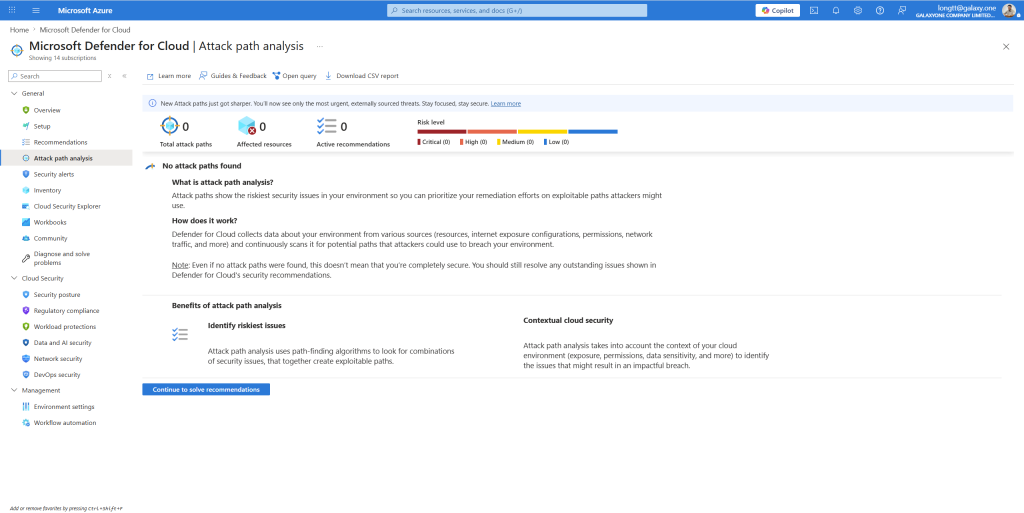
Bước 8: Attack path analysis
Đây là tính năng của Defender CSPM (paid), mô phỏng cách attacker có thể di chuyển từ internet đến sensitive data dựa trên misconfigurations hiện tại.
- Defender for Cloud → Posture management → Attack path analysis
- Click vào một attack path, ví dụ: “Internet exposed VM with high severity vulnerabilities can lead to data exfiltration from Storage Account”
- Xem attack path graph:
[Internet]
    │
    ▼ (Port 3389 open to internet)
[Windows VM]
    │
    ▼ (Unpatched CVE-2023-XXXX — remote code execution)
    │
    ▼ (VM has Managed Identity)
[Managed Identity]
    │
    ▼ (Storage Blob Data Reader permission)
    │
    ▼
[Storage Account with sensitive data]
- Click vào từng node xem:
- Risk factor: tại sao node này trong attack path
- Recommendations: cách break the path (fix bất kỳ một điểm nào trong chain là xong)
- Click Remediate trên node dễ fix nhất:
- Đóng port 3389 → bật JIT (đã làm bước 6)
- Patch CVE → vulnerability management
- Giảm permission Managed Identity → least privilege
Không cần fix tất cả mọi thứ, chỉ cần break một điểm trong attack chain là path đó không còn khả thi. Attack path analysis giúp bạn ưu tiên đúng chỗ thay vì fix hết recommendations theo thứ tự ngẫu nhiên.
Bước 9: Security alerts _ CWPP phát hiện tấn công
Khi Defender for Cloud phát hiện tấn công đang xảy ra trên workloads, nó tạo security alerts, khác với recommendations (misconfiguration tĩnh).
Một số alert thực tế hay gặp:
| Alert | Ý nghĩa |
|---|---|
| Suspicious authentication activity | Brute force hoặc password spray vào VM |
| Detected suspicious use of PowerShell | PowerShell obfuscation hoặc download |
| Fileless attack technique detected | Malware chạy trong memory, không có file |
| Possible data exfiltration activity | Upload lớn ra ngoài từ VM |
| Detected anomalous mix of upper and lower case in command line | Obfuscation technique |
| Privileged container detected | Container chạy với root privileges – risky |
- Click vào alert → xem:
- Description: gì đang xảy ra
- Evidence: process tree, command line, network connections
- Entities: resource nào bị ảnh hưởng
- Related alerts: alerts khác liên quan
- Investigation steps: Microsoft đề xuất làm gì
- Bấm Take action:
- Inspect resource (link đến MDE hoặc resource trực tiếp)
- Trigger automated response (playbook, kết nối với Sentinel bài 8)
- Suppress alert (nếu false positive)
Bước 10: Kết nối Defender for Cloud vào Sentinel
Đã làm ở bài 7 (Defender for Cloud connector). Nhắc lại nhanh để hoàn thiện vòng lặp:
Defender for Cloud alerts → Sentinel incidents → Automation rules → Playbooks → block/notify
Kiểm tra connector đang hoạt động:
- Sentinel → Data connectors → Microsoft Defender for Cloud
- Status phải là Connected
- Sentinel → Incidents → filter by source “Microsoft Defender for Cloud” → xác nhận alerts đang thành incidents
Sau bài này, Azure environment của bạn đã có:
- Secure Score đang được track, biết mình ở đâu và cần làm gì
- Defender plans bảo vệ Servers, Storage, CSPM
- Regulatory Compliance dashboard map với ISO 27001 và Azure Security Benchmark
- Vulnerability Assessment tự động scan VMs, tìm CVEs cần vá
- Just-in-time VM access RDP/SSH đóng mặc định, chỉ mở khi request
- File Integrity Monitoring phát hiện thay đổi file system đáng ngờ
- Attack path analysis nhìn thấy con đường attacker có thể khai thác
- Security alerts được đẩy vào Sentinel để SOAR tự xử lý
Tài liệu tham khảo
- Microsoft Defender for Cloud documentation
- Defender for Cloud pricing
- Just-in-time VM access
- File integrity monitoring
- Attack path analysis
- Vulnerability assessment with MDVM
Bài viết có gì chưa rõ hoặc bạn gặp lỗi ở bước nào, cứ để lại comment bên dưới nhé!
Long Tran | khongkho.com