Trong series này, mình đã xây lớp bảo vệ cho Identity, Endpoint, và Cloud Infrastructure. Tất cả đều quan trọng, nhưng có một câu hỏi chưa được trả lời: dữ liệu thực sự đang ở đâu, và ai đang làm gì với nó?
Attacker không cần phá vỡ tường firewall nếu có thể thuyết phục một nhân viên forward email ra ngoài. Ransomware không cần bypass EDR nếu user tự copy file lên USB. Và đôi khi nguy cơ lớn nhất không phải từ bên ngoài, mà từ insider: nhân viên nghỉ việc copy toàn bộ source code, hoặc nhân viên tài chính vô tình gửi bảng lương cho nhầm người.
Microsoft Purview giải quyết tầng bảo vệ này: biết dữ liệu nhạy cảm đang ở đâu, phân loại và dán nhãn tự động, ngăn thất thoát, và phát hiện hành vi bất thường từ bên trong.
Mình đã có một số bài về các tính năng Purview riêng lẻ trước đây:
Bài này mình sẽ kết nối tất cả thành một chiến lược hoàn chỉnh, thêm những phần chưa viết: Insider Risk Management, Communication Compliance, và Purview Audit.
Purview không phải một tính năng, đây là một nền tảng với nhiều công cụ phối hợp nhau theo vòng đời:
        KNOW                   CLASSIFY               PROTECT
   (Biết dữ liệu          (Phân loại và           (Mã hóa, hạn chế
    đang ở đâu)            dán nhãn tự động)        quyền truy cập)
         │                       │                       │
         ▼                       ▼                       ▼
   Content Explorer     Sensitivity Labels         Encryption
   Activity Explorer    Trainable Classifiers      Access Control
   Data Map             Auto-labeling              Rights Management
         │                       │                       │
         └───────────────────────┴───────────────────────┘
                                 │
                    ┌────────────┴────────────┐
                    ▼                         ▼
                PREVENT                   MONITOR
            (Ngăn thất thoát)      (Phát hiện vi phạm,
                                    hành vi bất thường)
                    │                         │
               DLP Policies            Purview Audit
               Endpoint DLP            Insider Risk Mgmt
               Comm. Compliance        eDiscovery
Mỗi bước phụ thuộc vào bước trước: bạn không thể ngăn thất thoát thứ bạn không biết là nhạy cảm, không thể phân loại thứ bạn không biết đang ở đâu.
Phân bổ theo location: Exchange, SharePoint, OneDrive, Teams
Drill down vào từng loại → xem files cụ thể
Từ thực tế: Lần đầu chạy Content Explorer, hầu hết doanh nghiệp đều ngạc nhiên khi thấy số lượng dữ liệu nhạy cảm nằm lung tung trong SharePoint và OneDrive files không ai nhớ đến, shared với “Everyone”, không có nhãn bảo mật nào.
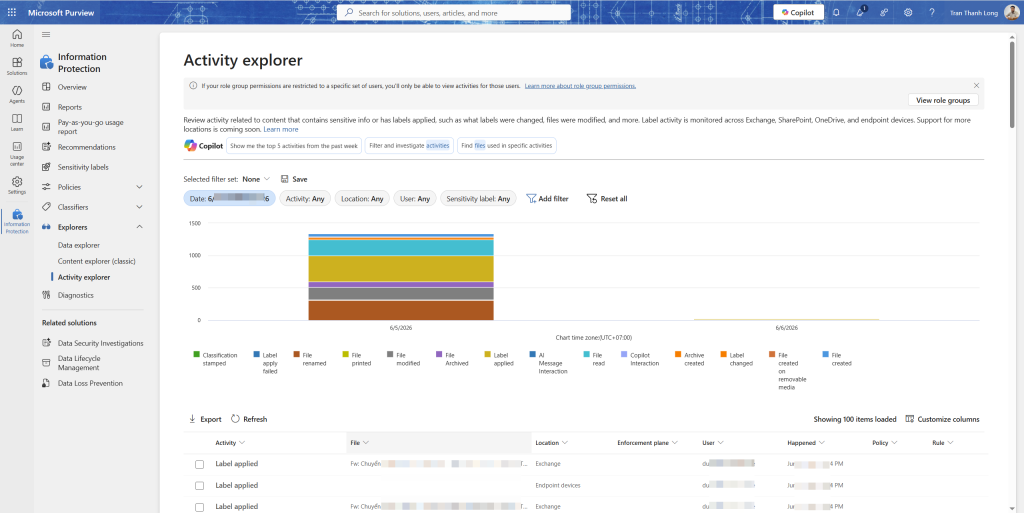
Activity Explorer
Activity Explorer cho biết người dùng đang làm gì với dữ liệu nhạy cảm.
Data classification → Activity explorer
Filter theo activity types:
Activity
Ý nghĩa
Label applied
User hoặc auto-labeling gán nhãn
Label changed
Nhãn bị thay đổi (downgrade là rủi ro)
Label removed
Nhãn bị xóa, đáng ngờ nếu không có lý do
File copied to removable media
Copy ra USB
File uploaded to cloud service
Upload lên Dropbox, Google Drive…
DLP policy matched
File vi phạm DLP policy
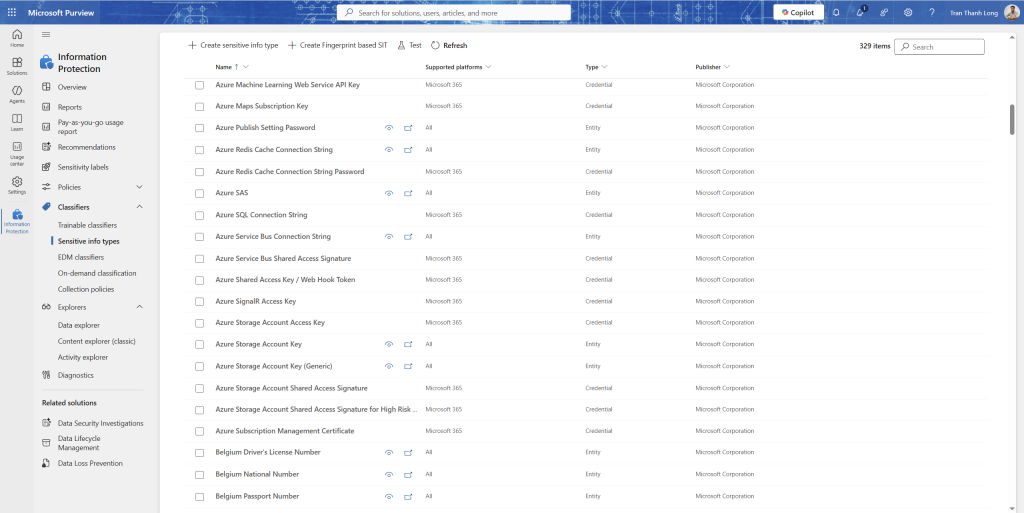
Bước 2: Sensitive Information Types nhận diện dữ liệu nhạy cảm
Sensitive Information Types (SIT) là nền tảng của Purview, định nghĩa “thế nào là dữ liệu nhạy cảm” bằng pattern (regex), keywords, và confidence levels.
Microsoft cung cấp 300+ SIT built-in. Nhưng dữ liệu đặc thù của từng doanh nghiệp cần SIT tùy chỉnh.
SIT built-in quan trọng
Purview portal → Data classification → Sensitive info types
Khám phá một số SIT có sẵn:
Tạo SIT tùy chỉnh, ví dụ mã nhân viên
Mã nhân viên thường có pattern cố định (ví dụ: NV + 6 chữ số). Đây là dữ liệu nhạy cảm nhưng không có SIT built-in.
Sensitive info types → + Create sensitive info type
Tên: Mã nhân viên nội bộ
+ Add a pattern:
Primary element: Regular expression
Regex: \bNV\d{6}\b
Confidence level: Medium (75%)
Supporting elements (tăng accuracy):
Keywords: mã nhân viên, employee ID, NV, staff ID
Character proximity: within 300 characters
Test pattern với sample text:
Text: "Nhân viên NV123456 đã nghỉ việc từ ngày 01/01/2025"
Expected result: Match với NV123456
Save SIT
Bước 3: Trainable classifiers phân loại bằng AI
Với nội dung phức tạp (hợp đồng, báo cáo tài chính, source code), regex không đủ. Trainable classifiers dùng machine learning để phân loại dựa trên ngữ nghĩa.
Microsoft cung cấp sẵn một số pre-trained classifiers:
Classifier
Nhận diện
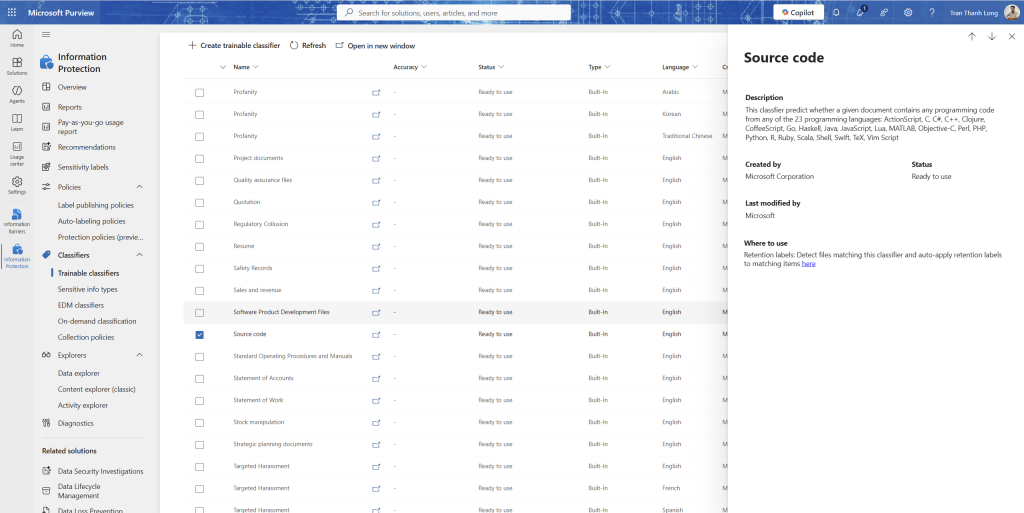
Source code
Java, Python, C#, JavaScript… (đã dùng trong bài Purview trước)
Financial documents
Balance sheets, income statements
HR documents
Resumes, offer letters, employee reviews
Legal documents
Contracts, NDAs, court orders
Tax forms
W-2, 1040, various tax documents
Medical records
Patient data, diagnoses
Purview portal → Data classification → Trainable classifiers
Xem danh sách pre-trained classifiers
Tạo custom trainable classifier (nâng cao)
Nếu cần nhận diện loại nội dung đặc thù (ví dụ: tài liệu nội bộ về chiến lược công ty), tạo custom classifier:
+ Create trainable classifier
Tên: Strategic documents - Internal
Seed content: upload 50-500 mẫu tài liệu đúng loại vào SharePoint folder
Chờ model train (~1 tuần)
Test phase: upload 200 mẫu test (positive và negative) → xem accuracy
Nếu accuracy > 70% → Publish
Lưu ý: Custom trainable classifier cần ít nhất 50 samples chất lượng cao để train. Cần thêm 200 samples để test. Chất lượng data training quyết định accuracy garbage in, garbage out.
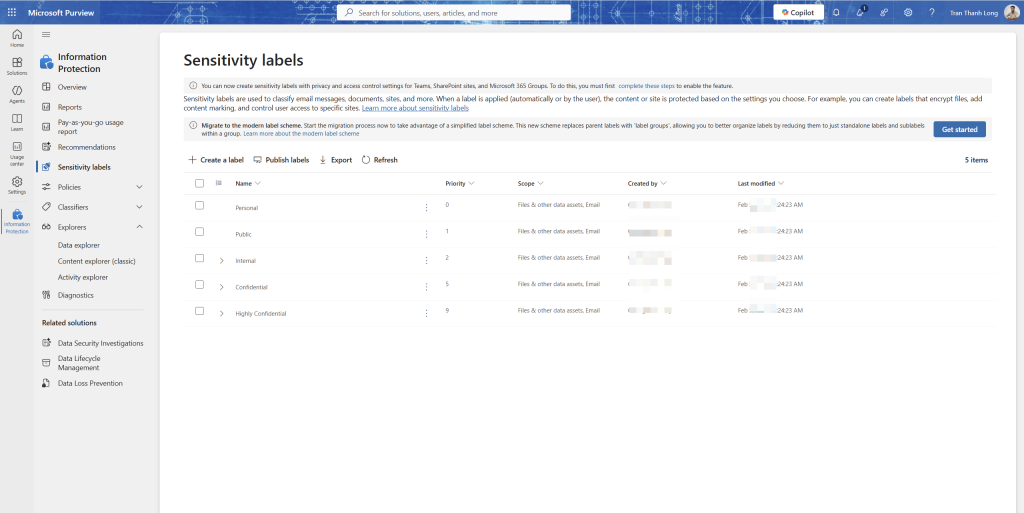
Bước 4: Sensitivity labels tạo label hierarchy
Sensitivity labels là cơ chế dán nhãn vào document và email để áp dụng bảo vệ tương ứng.
Thiết kế label hierarchy trước khi tạo
Đừng tạo labels tùy tiện. Thiết kế theo mô hình phân cấp rõ ràng:
Public          ─ Thông tin có thể chia sẻ công khai
Internal        ─ Dùng nội bộ, không chia sẻ ra ngoài
  ├── General   ─ Tài liệu chung nội bộ
  └── HR        ─ Tài liệu nhân sự (hạn chế hơn)
Confidential    ─ Tài liệu nhạy cảm, mã hóa
  ├── Finance   ─ Báo cáo tài chính, lương
  └── Legal     ─ Hợp đồng, NDA
Highly Confidential ─ Tuyệt mật, strict controls
  └── Trade Secret ─ IP, source code quan trọng
Tạo labels
Purview portal → Information protection → Labels → + Create a label
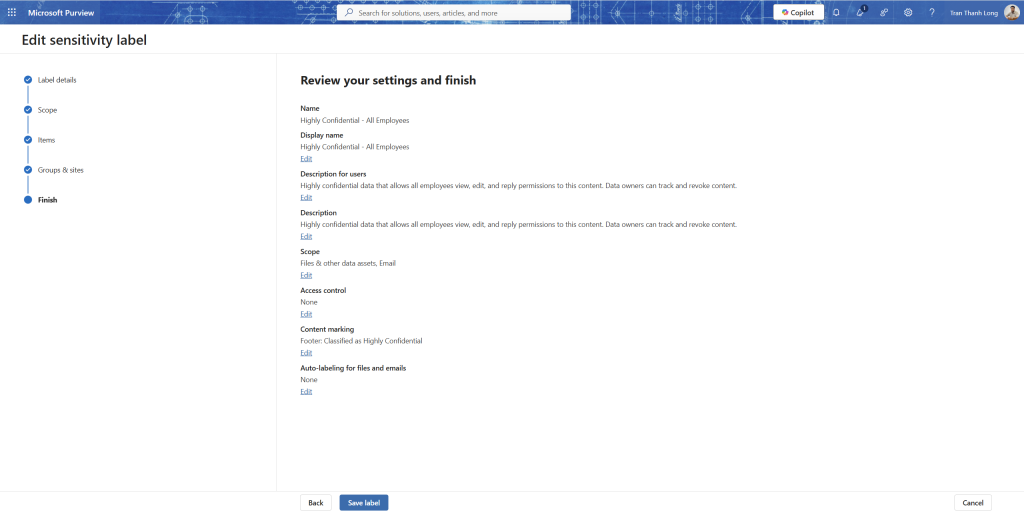
Cấu hình label Confidential \ Finance:
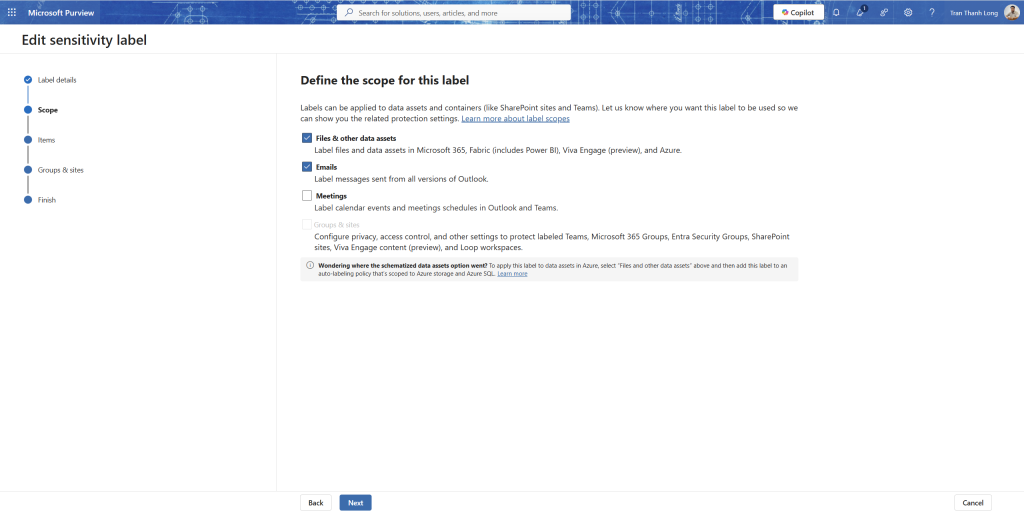
Tab Scope: Files & emails, Groups & sites, Schematized data assets
Tab Files & emails protection:
Apply or remove encryption: Yes
Assign permissions now or let users decide: Assign now
User access to content expires: Never (hoặc 90 days cho tài liệu time-sensitive)
Allow offline access: Only for a number of days: 30
Permissions:
Author: Co-Owner
Finance team group: Co-Author (có thể edit)
All employees: Viewer (chỉ đọc)
External users: blocked (không thể mở)
Tab Auto-labeling for files and emails:
Bật Auto-labeling
Conditions: khi content chứa SIT “Credit Card Number”, “Financial data”, hoặc custom SIT
Action: Apply label này
Tab Groups & sites:
Privacy: Private
External sharing: Only people in your organization
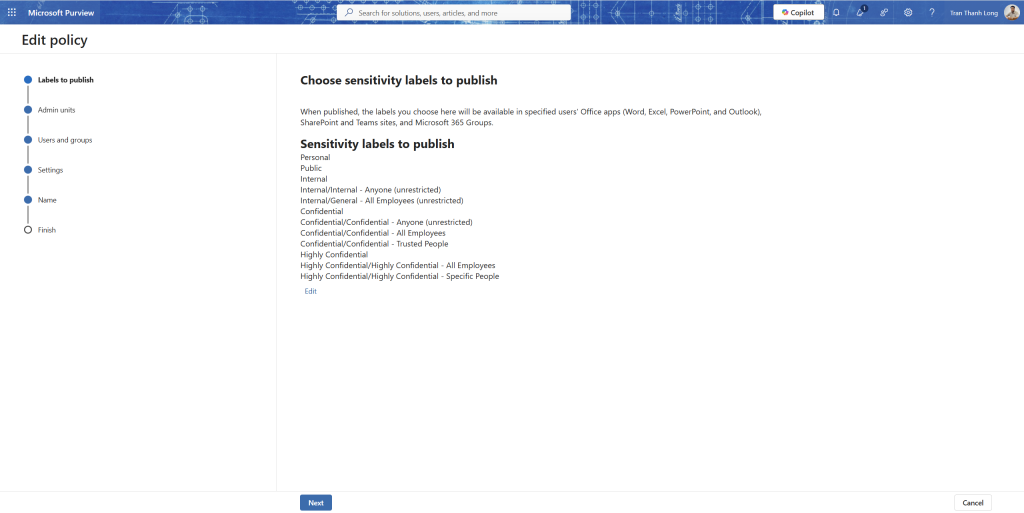
Publish label sau khi tạo:
Label policies → + Publish label
Chọn labels muốn publish
Assign to: All users (hoặc nhóm cụ thể)
Policy settings: require justification khi downgrade label
Bước 5: Auto-labeling service-side gán nhãn không cần user làm gì
Client-side labeling yêu cầu user tự chọn nhãn. Service-side auto-labeling tự động scan SharePoint, OneDrive, Exchange và gán nhãn mà không cần user tương tác.
Information protection → Auto-labeling → + Create auto-labeling policy
Tên: Auto-label Confidential Finance documents
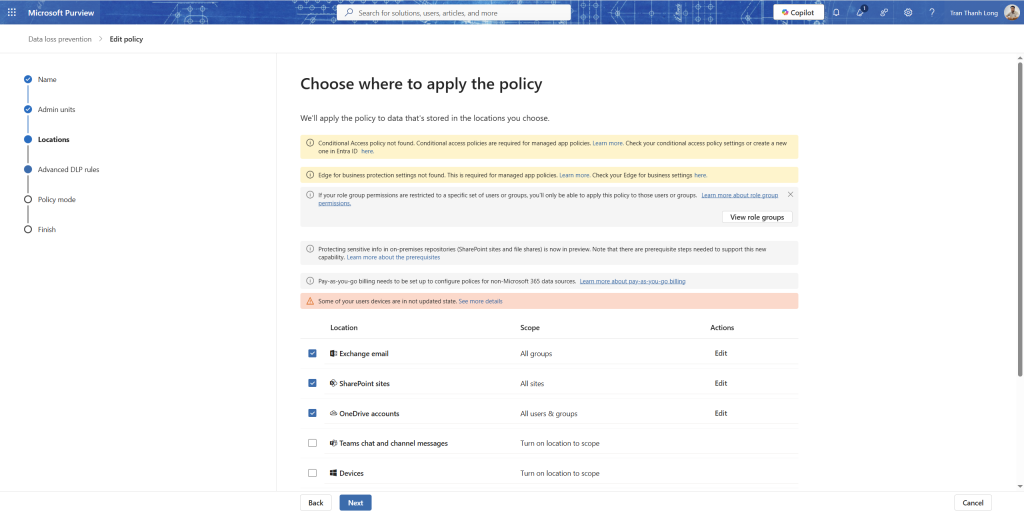
Locations:
Exchange email: All
SharePoint sites: tất cả hoặc sites cụ thể
OneDrive accounts: All
Policy rules:
Content contains: SIT Credit Card Number (High confidence)
OR content contains: SIT International Banking Account Number
OR trainable classifier: Financial documents
Label to apply: Confidential \ Finance
Simulation mode trước: bật Simulation để xem sẽ ảnh hưởng bao nhiêu files trước khi enforce
Sau khi review simulation, Turn on policy
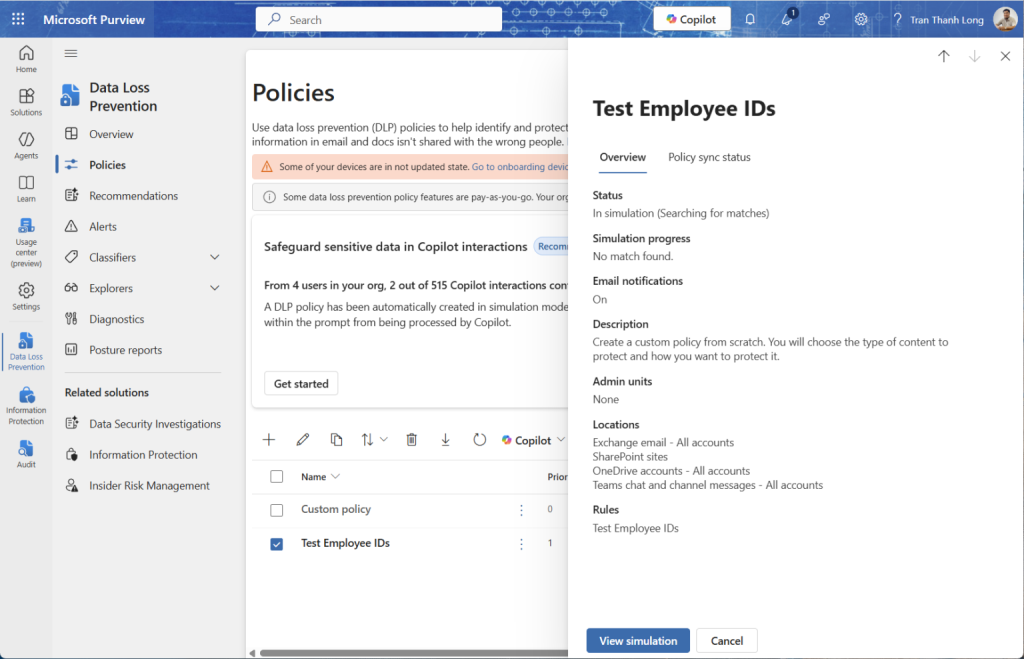
Bước 6: DLP policies ngăn thất thoát dữ liệu
Đã có bài chi tiết về DLP trên site. Bài này chỉ đề cập thêm các scenario nâng cao chưa cover.
Scenario: Block upload file có nhãn Confidential lên Cloud Storage cá nhân
Purview portal → Data loss prevention → Policies → + Create policy
Bắt đầu từ template: Custom policy
Tên: DLP - Block Confidential label upload to personal cloud
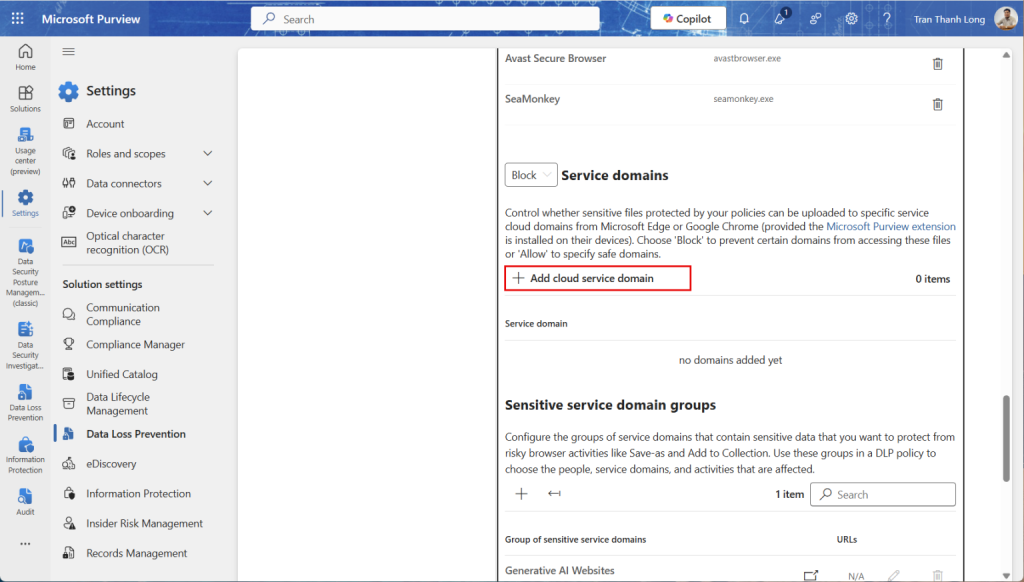
AND Activity is: Upload to cloud service or access by unallowed browser
Unallowed cloud services: Google Drive, Dropbox, Box, WeTransfer, Mega.nz
Action: Block with override (user có thể override nếu điền lý do business)
User notification: Bật hiển thị policy tip
Incident reports: Gửi email alert cho Security team
Scenario: Ngăn paste source code vào ChatGPT, Gemini
AI tools đang là con đường thất thoát mới, developer copy source code vào ChatGPT để hỏi debug mà không nghĩ đến rủi ro.
Thêm vào unallowed browser list:
chat.openai.com
gemini.google.com
claude.ai
copilot.microsoft.com (nếu không dùng Copilot for Work)
Condition: Content contains → SIT Source code hoặc sensitivity label Highly Confidential
Action: Block with override + require justification
Bước 7: Insider Risk Management
Đây là tính năng mình thấy ít người triển khai nhất, nhưng lại bắt được những thứ DLP không thể.
DLP chặn hành động cụ thể (copy file, send email). Insider Risk Management (IRM) phát hiện pattern hành vi theo thời gian, ví dụ: nhân viên trong 2 tuần trước ngày nghỉ việc bắt đầu download nhiều hơn bình thường, truy cập các thư mục không liên quan công việc, và search “competitor company jobs”.
Cấu hình điều kiện cần
Trước khi tạo policy, cần bật một số signals:
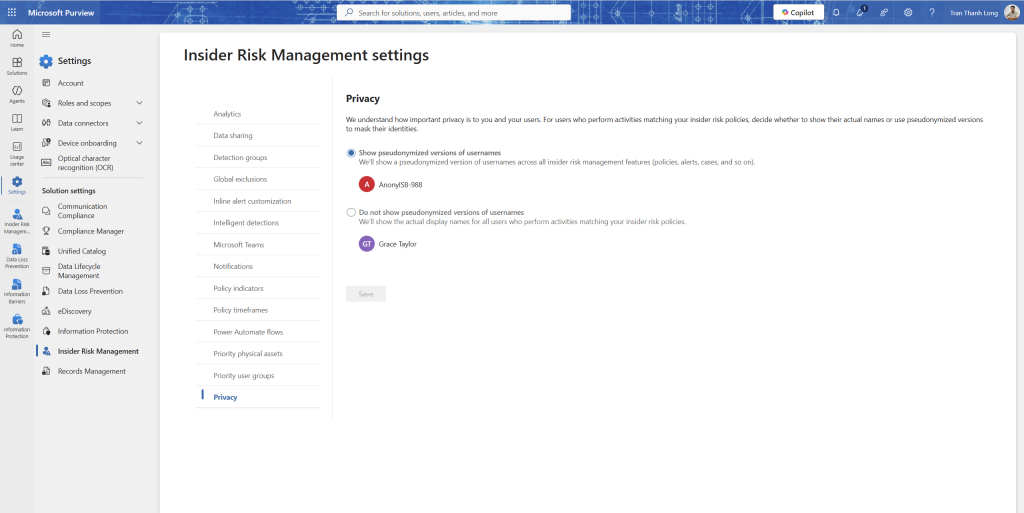
IRM → Settings → Privacy: chọn Show anonymized versions of usernames (privacy-preserving) hoặc Show actual user names tùy chính sách của tổ chức
Settings → Indicators: bật các signals cần theo dõi:
Indicator category
Bật những gì
Office indicators
SharePoint download, email forward, Teams message export
Device indicators
Copy to USB, print sensitive files, upload to personal cloud
Risk score boosters
HR termination date data, performance review data
Microsoft Defender alerts
MDE alerts liên quan đến user
Settings → Microsoft 365 HR connector (nếu có): kết nối với HR system để biết ai đang trong notice period, ai vừa nhận PIP (performance improvement plan)
Tạo Insider Risk policy
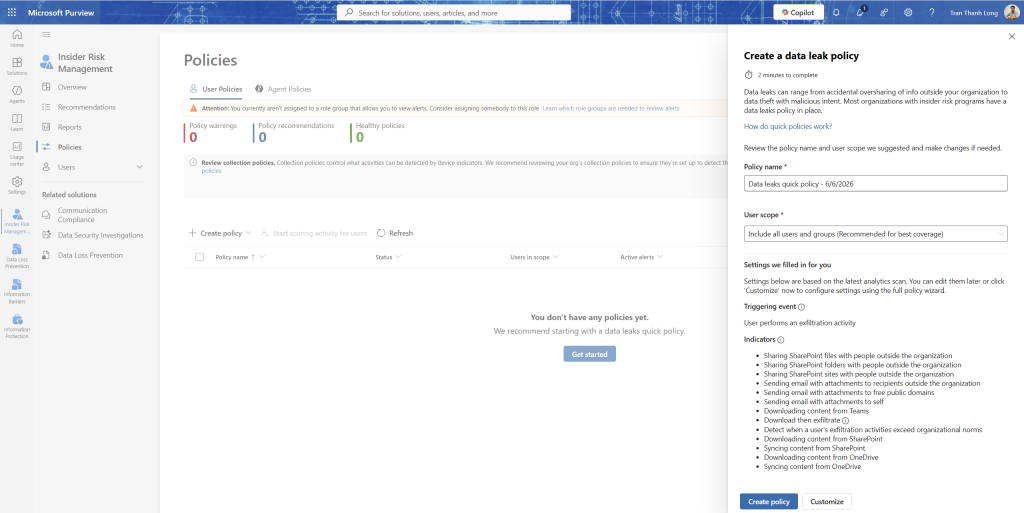
IRM → Policies → + Create policy
Template: Data theft by departing users
Tên: IRM - Departing employees data theft
Users and groups: All users
HR connector: kết nối với HR data (resignation date)
Indicators: chọn những indicators đã bật ở trên
Timeframes:
Past activity detection: 90 days
Future activity detection: 0 days (đến ngày cuối cùng làm việc)
Thresholds: để mặc định trước, tune sau khi có data
Xem IRM alerts
IRM → Alerts
Mỗi alert có risk score và breakdown hành vi tạo nên score
Click vào alert → Activity explorer trong context của user đó:
Timeline hành vi trong 90 ngày
Các files đã download, email đã forward, sites đã truy cập
Anomaly score so với baseline của user đó
Escalate thành case nếu cần điều tra sâu hơn → có thể liên kết với eDiscovery để thu thập evidence
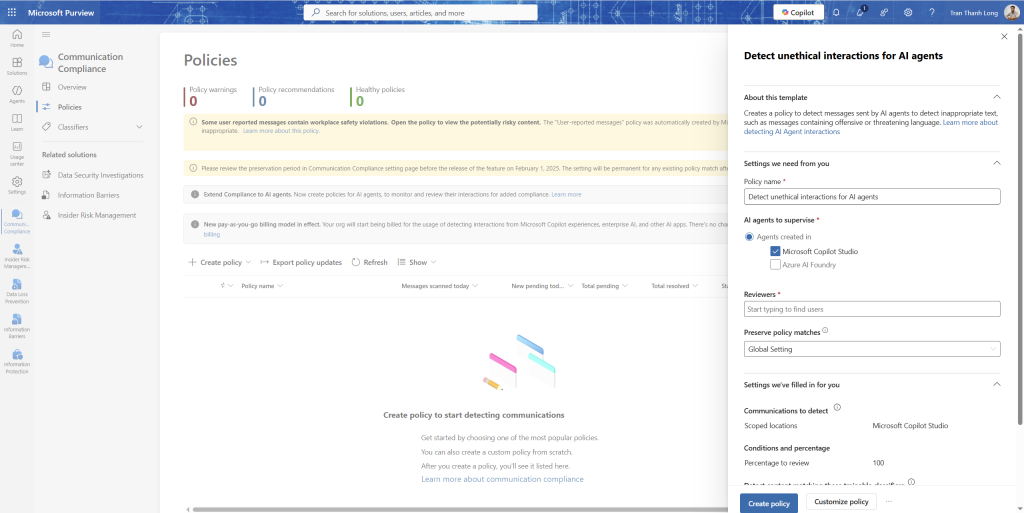
Bước 8: Communication Compliance
Communication Compliance monitor nội dung giao tiếp (email, Teams) để phát hiện vi phạm policy, harassment, hoặc thông tin nhạy cảm bị leak qua chat.
Use cases phổ biến:
Financial services: monitor trader conversations cho insider trading signals
HR compliance: phát hiện harassment, discrimination trong nội bộ
Data protection: phát hiện nhân viên chia sẻ thông tin confidential qua Teams
Communication compliance → Policies → + Create policy
Template: Detect sensitive information
Cấu hình:
Supervised users: All users
Reviewers: Compliance team (không phải IT, tách biệt roles)
Communications to monitor: Exchange email + Microsoft Teams
Direction: Inbound, Outbound, Internal
Conditions: Content contains SIT như Credit Card, Bank Account, Social Security Number
Sau khi policy chạy, reviewers vào Alerts để review messages đã được flag
Lưu ý về Privacy: Communication Compliance có strong privacy controls, reviewer chỉ thấy messages được flag, không thể browse tất cả communications. Cần thông báo cho nhân viên theo labor law của từng quốc gia trước khi triển khai.
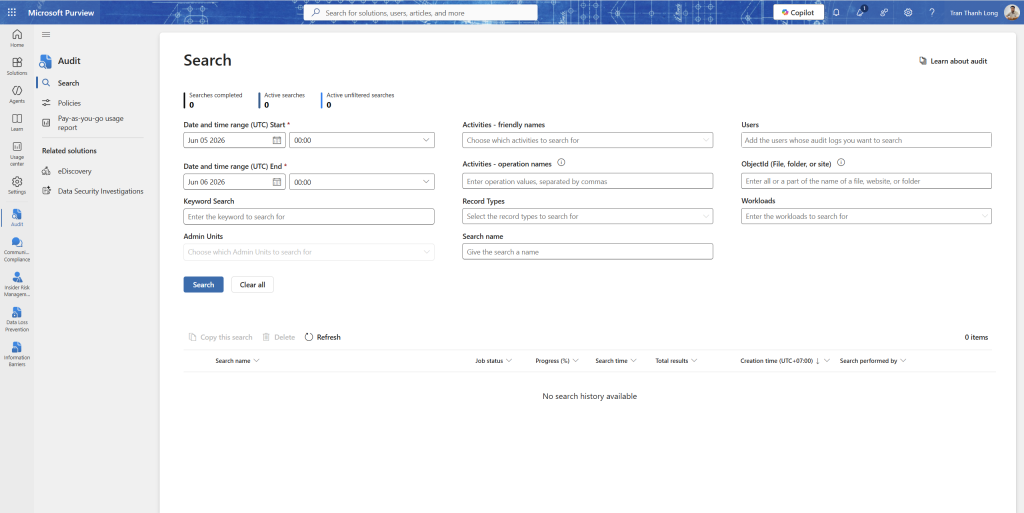
Bước 9: Purview Audit unified audit log
Purview Audit ghi lại tất cả hành động admin và user trong Microsoft 365 ai làm gì, lúc nào, từ đâu.
Audit Standard vs Premium
Tính năng
Standard (E3)
Premium (E5)
Retention
90 ngày
1 năm (mở rộng lên 10 năm)
Log types
Cơ bản
Tất cả + intelligent insights
High-value events
Không
Có (mail read, search query…)
Bandwidth
Standard
High
Bật Audit và tìm kiếm
Purview portal → Audit → kiểm tra Audit đang On
Tìm kiếm audit logs:
Date range: tuần vừa rồi
Activities: chọn “User signed in” và “File accessed”
Users: chọn user cụ thể nếu đang điều tra
File/folder/site: nếu muốn xem ai đã truy cập file cụ thể
Search → xem kết quả
Audit log cho điều tra forensics
Khi có Incident (từ bài 5, 7, 8), Audit log là nguồn Evidence quan trọng. Ví dụ:
-- Query trong Sentinel để tìm audit events của user bị compromise
OfficeActivity
| where TimeGenerated > ago(7d)
| where UserId == "user@contoso.com"
| where Operation in ("MailboxLogin", "Send", "MoveToDeletedItems",
                       "FileDownloaded", "SearchQuery")
| project TimeGenerated, Operation, ClientIP, UserAgent,
          SourceFileName, DestinationFileName
| sort by TimeGenerated desc
Bước 10: Kết nối Purview vào Sentinel
Purview audit logs có thể được stream vào Sentinel để tương quan với signals khác.
Sentinel → Data connectors → Microsoft 365 → Open connector page
Bật Office 365 logs (Exchange, SharePoint, Teams)
Kiểm tra trong Log Analytics:
OfficeActivity
| where TimeGenerated > ago(1h)
| summarize count() by OfficeWorkload, Operation
| sort by count_ desc
Tạo analytics rule tương quan DLP + IRM + XDR:
// Tìm user vừa vi phạm DLP, vừa có IRM alert, vừa có MDE alert
let DLPViolators =
    OfficeActivity
    | where TimeGenerated > ago(7d)
    | where RecordType == "ComplianceDLPExchange" or RecordType == "ComplianceDLPSharePoint"
    | where Operation == "DlpRuleMatch"
    | summarize DLPCount = count() by UserId;
let IRMAlerts =
    SecurityAlert
    | where TimeGenerated > ago(7d)
    | where ProviderName == "IRM"
    | extend UserId = tostring(Entities[0].UserPrincipalName)
    | summarize IRMCount = count() by UserId;
let MDEAlerts =
    SecurityAlert
    | where TimeGenerated > ago(7d)
    | where ProviderName == "Microsoft Defender Advanced Threat Protection"
    | extend UserId = tostring(Entities[0].UserPrincipalName)
    | summarize MDECount = count() by UserId;
DLPViolators
| join kind=inner IRMAlerts on UserId
| join kind=inner MDEAlerts on UserId
| project UserId, DLPCount, IRMCount, MDECount
| where DLPCount > 2 and IRMCount > 0 and MDECount > 0
Query này tìm user đang có cả 3 dấu hiệu: vi phạm DLP nhiều lần + IRM alert + MDE alert, pattern rất đáng ngờ, có thể là insider threat hoặc compromised account đang bị khai thác.
Data Protection Maturity Model
Sau khi làm xong tất cả các bước, đây là cách đánh giá mức độ trưởng thành:
Level
Mô tả
Đã hoàn thành
Level 1: Visible
Biết dữ liệu nhạy cảm đang ở đâu
Content Explorer bài này
Level 2: Classified
Dữ liệu được phân loại và dán nhãn
SIT + Sensitivity Labels
Level 3: Protected
Dữ liệu được mã hóa, quyền truy cập được kiểm soát
Label encryption + DLP
Level 4: Monitored
Mọi hành động với dữ liệu nhạy cảm đều được log
Audit log + Activity Explorer
Level 5: Intelligent
Phát hiện bất thường tự động, không cần biết rule trước
IRM + Sentinel correlation
Hầu hết doanh nghiệp Việt Nam hiện ở Level 1-2. Làm đến Level 4 là đã tốt hơn 90% thị trường. Level 5 là đích cần hướng tới.