
Chào các bạn!
Sau 6 bài xây dựng bảo vệ từ Identity đến Endpoint, phát hiện threat bằng Defender XDR và hunting bằng KQL, câu hỏi mình hay được hỏi là: “Vậy còn Sentinel để làm gì?”
Câu trả lời ngắn: Defender XDR rất tốt, nhưng chỉ nhìn thấy dữ liệu từ các sản phẩm Microsoft. Khi một attacker vào qua firewall Palo Alto, leo thang qua Linux server, rồi mới đến Microsoft 365, Defender XDR chỉ thấy đoạn cuối. Microsoft Sentinel thấy toàn bộ chuỗi vì nó nhận dữ liệu từ mọi nguồn: firewall, router, cloud khác (AWS, GCP), on-prem servers, custom applications.
Ngoài ra, Sentinel còn là nơi để:
- Lưu trữ log dài hạn với chi phí thấp hơn (compliance yêu cầu giữ log 1-3 năm)
- Viết analytics rules tùy chỉnh phức tạp hơn custom detection trong XDR
- Xây dựng workbooks (dashboard) cho từng team: SOC, management, compliance
- Chạy SOAR playbooks tự động hóa response
Bài này mình sẽ hướng dẫn deploy Sentinel từ đầu, kết nối các nguồn dữ liệu, và tạo analytics rules đầu tiên.
Kiến trúc Microsoft Sentinel
Trước khi vào lab, cần hiểu Sentinel được xây trên nền gì:
Microsoft Sentinel
        │
        ▼
Log Analytics Workspace  ◄── nơi lưu trữ tất cả log
        │
        ├── Data Connectors  ◄── kết nối nguồn dữ liệu vào
        ├── Analytics Rules  ◄── logic phát hiện threat
        ├── Incidents        ◄── alert được gộp thành incident
        ├── Workbooks        ◄── visualization/dashboard
        ├── Playbooks        ◄── automation (Logic Apps)
        └── UEBA             ◄── behavioral analytics
Log Analytics Workspace là nền tảng — đây là nơi thực sự lưu dữ liệu, Sentinel là “layer” bảo mật xây trên đó. Khi query KQL trong Sentinel, bạn đang query thẳng vào Log Analytics.
Mô hình chi phí, đọc kỹ trước khi deploy
Sentinel tính phí theo GB dữ liệu được ingest. Đây là thứ hay bị bỏ qua và gây shock khi nhận bill.
| Tier | Giá (pay-as-you-go) | Phù hợp |
|---|---|---|
| Commitment 100 GB/ngày | ~$196/ngày | Enterprise lớn |
| Commitment 50 GB/ngày | ~$123/ngày | Enterprise vừa |
| Pay-as-you-go | ~$2.46/GB | SMB, lab, bắt đầu |
| Microsoft 365 E5 benefit | 5 GB/ngày miễn phí | Có E5 license |
Quan trọng: Nếu bạn đang dùng Microsoft 365 E5, bạn được 5 GB/ngày miễn phí trong Sentinel. Với tenant SMB 50-100 user chỉ kết nối Microsoft 365 data, 5 GB/ngày thường là đủ. Kiểm tra lại billing sau 3 ngày đầu để biết mình đang dùng bao nhiêu trước khi bật thêm connector.
Ước tính dữ liệu theo nguồn (approximate)
| Nguồn | GB/ngày (100 users) |
|---|---|
| Microsoft 365 Defender (MDE + MDO) | 1-3 GB |
| Entra ID sign-in logs | 0.2-0.5 GB |
| Azure Activity logs | 0.1-0.3 GB |
| Windows Security Events (all) | 5-15 GB |
| Windows Security Events (minimal) | 0.5-1 GB |
| Firewall logs | 2-10 GB (tùy traffic) |
Mẹo tiết kiệm chi phí: Bắt đầu chỉ kết nối Microsoft 365 Defender và Entra ID. Thêm dần các connector khác sau khi hiểu volume dữ liệu.
Điều kiện cần
| Yêu cầu | Chi tiết |
|---|---|
| Azure subscription | Cần để deploy Log Analytics workspace |
| License Sentinel | Pay-as-you-go hoặc E5 benefit |
| Quyền Azure | Contributor trên resource group, Microsoft Sentinel Contributor role |
| Quyền Microsoft 365 | Security Administrator hoặc Global Administrator |
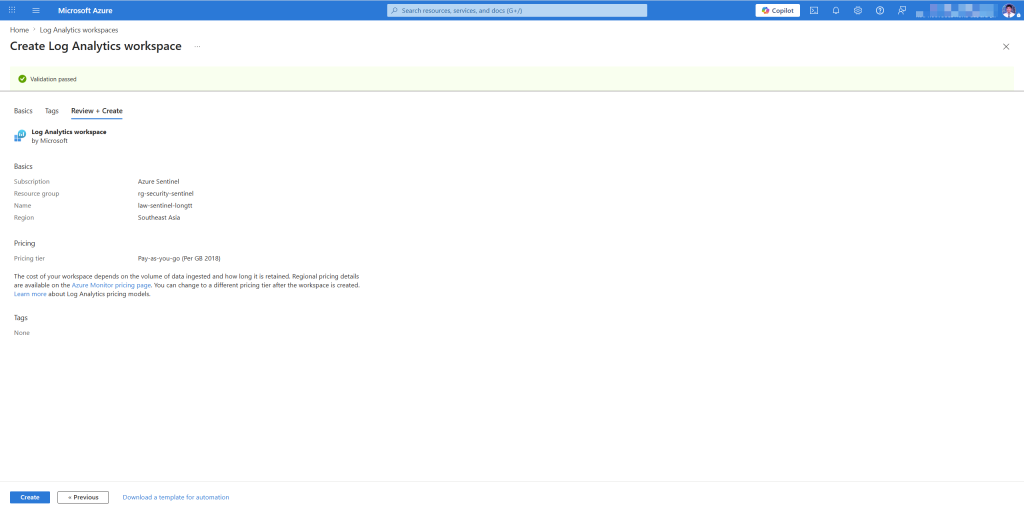
Bước 1: Tạo Log Analytics workspace và deploy Sentinel
1a. Tạo Log Analytics workspace
- Vào portal.azure.com
- Tìm Log Analytics workspaces → + Create
- Cấu hình:
- Subscription: chọn subscription của bạn
- Resource group: tạo mới
rg-security-sentinel - Name:
law-sentinel-longtt (tên phải unique) - Region: chọn region gần nhất, Southeast Asia (Singapore) cho Việt Nam
- Bấm Review + Create → Create
Lưu ý region: Dữ liệu lưu ở đâu phụ thuộc vào region. Với doanh nghiệp có yêu cầu data residency, chọn region phù hợp. Southeast Asia (Singapore) là lựa chọn phổ biến cho Việt Nam.
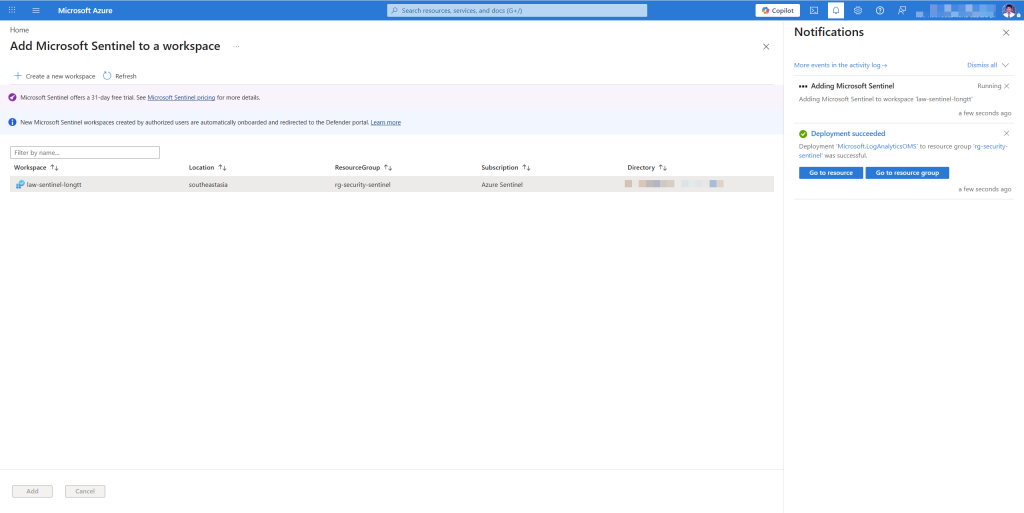
1b. Deploy Microsoft Sentinel lên workspace
- Tìm Microsoft Sentinel trong Azure portal → + Create
- Chọn workspace vừa tạo → Add
- Chờ 1-2 phút để Sentinel được provision
Lần đầu vào Sentinel sẽ thấy tất cả widget đều trống, bình thường vì chưa có dữ liệu. Việc tiếp theo là kết nối dữ liệu vào.
Bước 2: Kết nối Microsoft 365 Defender
Đây là connector quan trọng nhất, đưa toàn bộ dữ liệu từ Defender XDR (bài 4-6) vào Sentinel để lưu trữ dài hạn và phân tích chéo.
- Trong Sentinel → Content management → Content hub
- Tìm Microsoft Defender XDR → Install
- Sau khi install → Data connectors → tìm Microsoft Defender XDR → Open connector page
[screenshot: Content hub, Microsoft Defender XDR đang được install]
- Trong connector page → Connect incidents & alerts
- Tick Turn on để sync incidents từ Defender XDR sang Sentinel
- Trong phần Connect events, chọn các bảng muốn sync:
| Bảng | Có nên bật | Lý do |
|---|---|---|
| DeviceEvents | Có | Telemetry endpoint đầy đủ |
| DeviceProcessEvents | Có | Process execution — quan trọng cho hunting |
| DeviceNetworkEvents | Có | Network connections |
| DeviceFileEvents | Có | File operations |
| EmailEvents | Có | Email delivery logs |
| EmailUrlInfo | Có | URLs trong email |
| CloudAppEvents | Có | SaaS app activity |
| DeviceImageLoadEvents | Tùy | DLL loads — volume cao |
| DeviceRegistryEvents | Tùy | Registry — volume rất cao |
- Bấm Apply changes
Bước 3: Kết nối Microsoft Entra ID
Log đăng nhập và audit log từ Entra ID là nguồn thông tin quan trọng để phát hiện compromised accounts.
- Content hub → tìm Microsoft Entra ID → Install
- Data connectors → Microsoft Entra ID → Open connector page
- Bật các log sources:
| Log type | Nên bật | Volume |
|---|---|---|
| Sign-in logs | Có | Trung bình |
| Audit logs | Có | Thấp |
| Non-interactive sign-in logs | Có | Cao (service accounts) |
| Service principal sign-in logs | Có | Thấp-Trung bình |
| Provisioning logs | Tùy | Thấp |
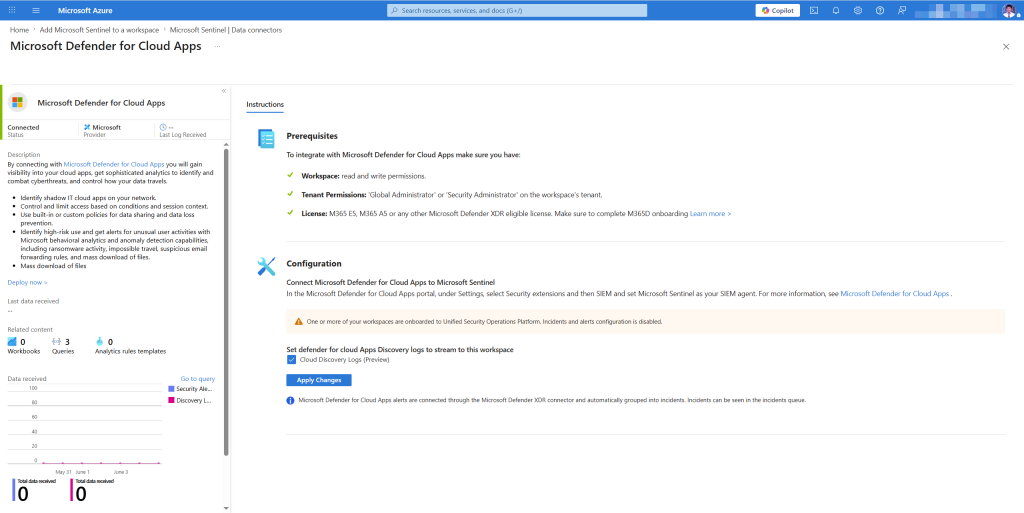
Bước 4: Kết nối Microsoft Defender for Cloud
Nếu bạn dùng Azure workloads (VMs, Storage, SQL…), connector này đưa security alerts từ Defender for Cloud vào Sentinel.
- Content hub → Microsoft Defender for Cloud → Install
- Data connectors → Microsoft Defender for Cloud → Open connector page
- Chọn subscription → Connect
- Toggle Bi-directional sync → Enabled (incident được tạo trong Sentinel sẽ update lại Defender for Cloud và ngược lại)
Bước 5: Kết nối nguồn non-Microsoft Windows Security Events
Đây là điểm mạnh của Sentinel so với Defender XDR thuần, nhận log từ on-prem servers.
- Content hub → Windows Security Events → Install
- Data connectors → Windows Security Events via AMA → Open connector page
- Tạo Data Collection Rule (DCR):
- Bấm + Create data collection rule
- Tên:
DCR-Windows-Security-Events - Region: Southeast Asia
- Resources: Add các Windows servers muốn collect
- Collect: Chọn event set
| Event set | Nội dung | GB/ngày (est.) |
|---|---|---|
| All security events | Mọi thứ | 5-15 GB |
| Common | Logon, process, policy change | 1-3 GB |
| Minimal | Chỉ logon/logoff | 0.2-0.5 GB |
Khuyên dùng: Bắt đầu với Common đủ để phát hiện hầu hết attack patterns mà không tốn quá nhiều chi phí. Chuyển sang All chỉ khi có yêu cầu compliance cụ thể.
Bước 6: Kiểm tra dữ liệu đã vào chưa
Sau 15-30 phút kể từ khi bật connectors, kiểm tra dữ liệu đang chảy vào.
- Trong Sentinel → Logs (hoặc vào Log Analytics workspace trực tiếp)
- Chạy query kiểm tra:
// Kiểm tra các bảng đang có dữ liệu
search *
| where TimeGenerated > ago(1h)
| summarize Count = count() by Type
| sort by Count desc
// Kiểm tra sign-in logs từ Entra ID
SigninLogs
| where TimeGenerated > ago(1h)
| take 10
// Kiểm tra dữ liệu từ Defender XDR
DeviceEvents
| where TimeGenerated > ago(1h)
| take 10
Nếu query trả về kết quả — connector đang hoạt động.
Bước 7: Bật analytics rules Microsoft Security incidents
Analytics rules là trái tim của Sentinel, logic phát hiện mối đe dọa. Có 3 loại:
- Microsoft Security: tự động tạo Sentinel incident từ alerts của các sản phẩm Microsoft (Defender XDR, Defender for Cloud…)
- Scheduled: query KQL chạy định kỳ, tạo alert nếu có kết quả
- NRT (Near Real-Time): query KQL chạy gần như realtime (mỗi phút)
- ML Behavior Analytics: dùng machine learning phát hiện anomaly
Bật Microsoft Security rules trước
Đây là cách nhanh nhất để có incidents, mỗi alert từ Defender products tự động tạo incident trong Sentinel.
- Sentinel → Analytics → Rule templates
- Filter: Rule type = Microsoft Security
- Bật các rules quan trọng:
| Rule | Source | Nên bật |
|---|---|---|
| Create incidents based on Microsoft Defender for Endpoint alerts | MDE | Có |
| Create incidents based on Microsoft Defender for Office 365 alerts | MDO | Có |
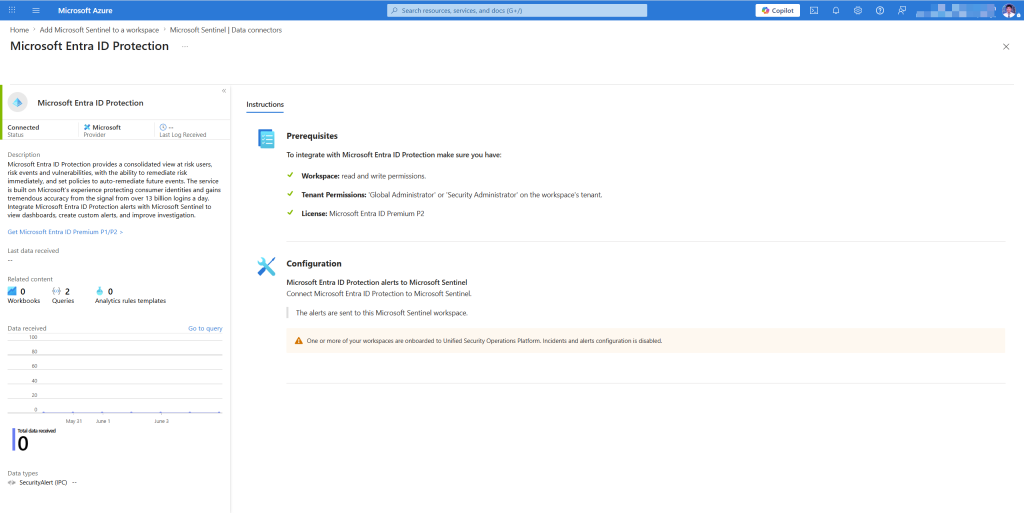
| Create incidents based on Microsoft Entra ID Protection alerts | Entra ID P | Có |
| Create incidents based on Microsoft Defender for Cloud alerts | MDfC | Có |
| Create incidents based on Microsoft Defender for Cloud Apps alerts | MDCA | Có |
- Chọn từng rule → Create rule → để mặc định → Save
Bước 8: Tạo custom analytics rule với KQL
Đây là nơi bạn viết logic phát hiện riêng bổ sung cho những gì Microsoft chưa cover.
Ví dụ thực tế: tạo rule phát hiện khi có user được thêm vào Global Administrator role ngoài giờ hành chính, dấu hiệu của account takeover.
- Sentinel → Analytics → + Create → Scheduled query rule
Tab General
- Name:
Global Admin role assigned outside business hours - Description: Phát hiện khi user được gán Global Administrator ngoài giờ 8h-18h, thứ 2 đến thứ 6
- Severity: High
- Tactics: Privilege Escalation (MITRE ATT&CK)
- Techniques: T1078 – Valid Accounts
Tab Set rule logic
AuditLogs
| where TimeGenerated > ago(1d)
| where OperationName == "Add member to role"
| where TargetResources has "Global Administrator"
| extend
    InitiatedBy = tostring(InitiatedBy.user.userPrincipalName),
    TargetUser = tostring(TargetResources[0].userPrincipalName),
    HourOfDay = hourofday(TimeGenerated),
    DayOfWeek = dayofweek(TimeGenerated)
| where HourOfDay < 8 or HourOfDay > 18
    or DayOfWeek == time(0d)   // Chủ nhật
    or DayOfWeek == time(6d)   // Thứ 7
| project TimeGenerated, InitiatedBy, TargetUser,
          HourOfDay, DayOfWeek, OperationName, Result
- Run query every: 1 hour
- Lookup data from the last: 1 day
- Alert threshold: Generate alert when number of query results is greater than 0
Tab Incident settings
- Create incidents from alerts: Enabled
- Alert grouping: Group alerts into single incident nếu xảy ra trong vòng 1 hour
Tab Automated response
Để trống ở bài này — phần Playbooks sẽ làm ở bài 8.
- Bấm Review and create → Save
Bước 9: Bật Fusion rule AI-powered correlation
Fusion là tính năng đặc biệt của Sentinel: dùng machine learning để tương quan các signal nhỏ riêng lẻ (mỗi cái không đủ để tạo alert) thành một incident lớn.
Ví dụ: sign-in từ IP lạ + thay đổi MFA settings + mass download, mỗi cái riêng lẻ có thể là false positive, nhưng cộng lại là dấu hiệu rõ ràng của account compromise. Fusion tự động nhóm chúng lại.
- Sentinel → Analytics → Rule templates
- Filter: Rule type = Fusion
- Bật rule Advanced Multistage Attack Detection
Bước 10: Workbooks dashboard cho từng đối tượng
Workbooks là bộ dashboard có sẵn cho từng use case. Không cần tự build từ đầu.
- Sentinel → Threat management → Workbooks → tab Templates
Một số workbooks quan trọng cần install:
| Workbook | Dùng cho | Ai nên xem |
|---|---|---|
| Azure AD Audit, Activity and Sign-in logs | Sign-in anomalies, failed logins | SOC analyst |
| Microsoft Defender for Endpoint | Endpoint threats overview | SOC analyst |
| Identity & Access | User risk, privileged access | Security manager |
| Insecure Protocols | Legacy auth usage | IT admin |
| Security Operations Efficiency | MTTR, alert volume, analyst load | SOC manager |
| Zero Trust (TIC 3.0) | Zero Trust maturity dashboard | CISO, management |
Cách install workbook:
- Click vào workbook template → Save
- Chọn subscription và resource group → Save
- Click View saved workbook để mở
Bước 11: UEBA — phát hiện anomaly dựa trên hành vi
User and Entity Behavior Analytics (UEBA) học pattern bình thường của từng user và thiết bị, rồi tự động highlight khi có deviation.
- Sentinel → Configuration → Settings → tab UEBA
- Bật Microsoft Entra ID và Microsoft Defender for Endpoint làm nguồn identity
- Bật UEBA
Sau 7-14 ngày học baseline, UEBA bắt đầu tạo entity insights, mỗi user và device sẽ có một score đánh giá mức độ bất thường.
Xem UEBA insights:
- Sentinel → Threat management → Entity behavior
- Tìm kiếm user hoặc device cụ thể
- Xem Investigation priority score và timeline của các activities bất thường
Bước 12: Kiểm tra incident đầu tiên trong Sentinel
Sau khi cấu hình xong, vào Sentinel → Threat management → Incidents để xem.
[screenshot: Sentinel incident queue, incidents đang xuất hiện từ Microsoft Security rules, mỗi incident có severity và status]
So sánh với Defender XDR incident queue: Sentinel incidents có thể đến từ nhiều nguồn hơn và có thêm context từ UEBA, Fusion, và custom analytics rules.
Điều tra incident trong Sentinel:
- Click vào incident → View full details
- Tab Overview: tóm tắt, entities, related incidents
- Tab Entities: user và device bị ảnh hưởng với UEBA score
- Bấm Investigate để mở investigation graph, tương tự attack graph trong XDR nhưng rộng hơn
Chi phí sau khi setup (ước tính cho 100 users)
| Nguồn dữ liệu | GB/ngày | Chi phí/tháng |
|---|---|---|
| Microsoft 365 Defender | ~2 GB | E5 benefit (miễn phí) |
| Entra ID logs | ~0.3 GB | E5 benefit (miễn phí) |
| Windows Events (Common) | ~1.5 GB | E5 benefit (miễn phí) |
| Azure Activity | ~0.1 GB | E5 benefit (miễn phí) |
| Tổng | ~3.9 GB/ngày | Nằm trong 5 GB free |
Với setup cơ bản này và E5 license, chi phí Sentinel gần như bằng 0. Chi phí phát sinh khi bắt đầu kết nối firewall logs hoặc non-Microsoft sources có volume lớn.
Tài liệu tham khảo
- Microsoft Sentinel documentation
- Microsoft Sentinel pricing
- Data connectors reference
- Analytics rules in Microsoft Sentinel
- UEBA in Microsoft Sentinel
- Microsoft Sentinel GitHub
Bài viết có gì chưa rõ hoặc bạn gặp lỗi ở bước nào, cứ để lại comment bên dưới nhé!
Long Tran | khongkho.com